
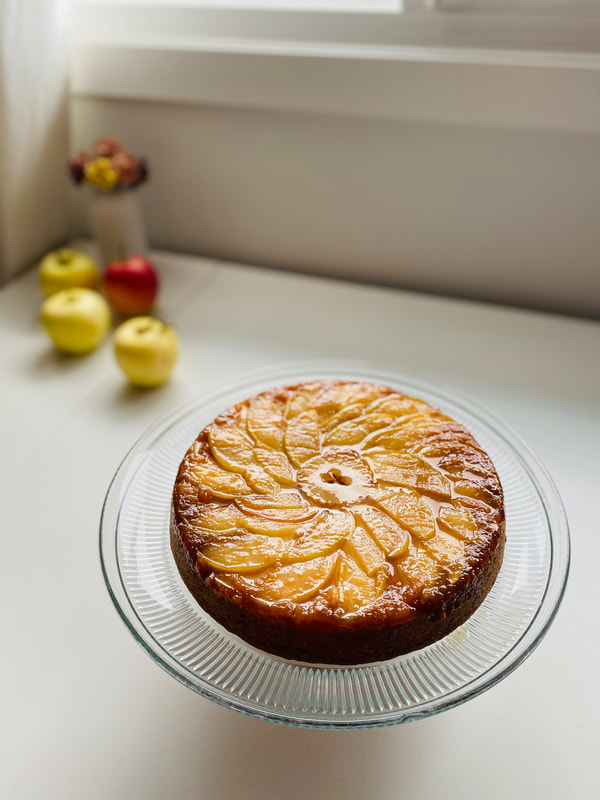
 My offering for the 2023 Friendsgiving Extravaganza! I love my pals, This cake got devoured! I served it with Bourbon Butterscotch Ice Cream which was a real crowd pleaser. Daniel Roberts (aka deep sea dan) hosted us and his house (his mom's house) is the coolest. It was a wonderful evening of awesome friends, awesome food, and a whole lot to be grateful for. As always! Apple Upside-Down CakeRecipe slightly adapted from Rose Levy Beranbaum Caramelized Apple Top:
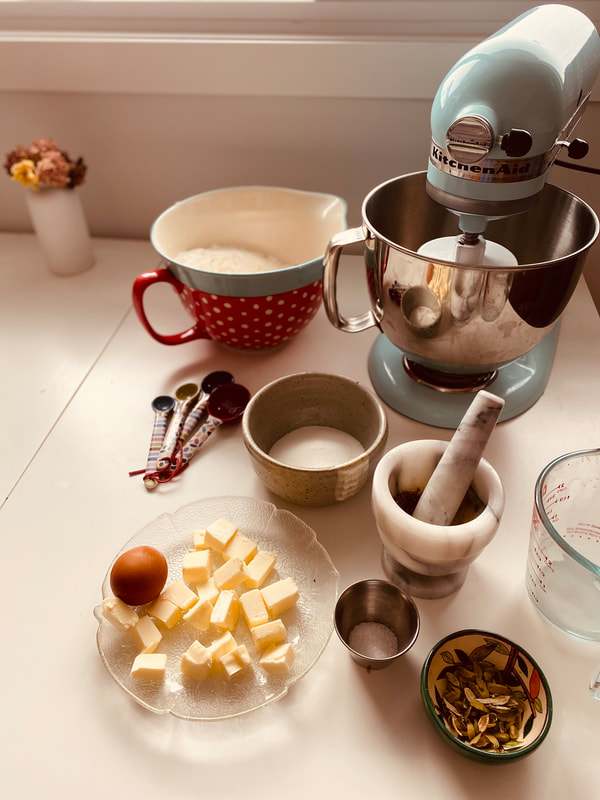
Meanwhile, prepare you cake pan! Spray a 9" pan with cooking spray and line the bottom with a parchment round. In a small heavy saucepan, melt the butter. Use about 1 tbsp to coat the parchment lined bottom and sides of the cake pan. To the remaining melted butter in the pan, add the reserved liquid and remaining brown sugar. Bring to a boil, stirring constantly with a spatula. Once boiling, stop stirring and leave to bubble and cook for about 3 minutes until thick and deep amber in colour. Pour this mixture (Rose says "do not scrape") into the prepared cake pan, tilting the pan to coat the entire bottom. The mixture will probably harden, don't worry. It will melt back during baking and become all lovely and soft and hug the apples in a nice caramel coat. Place the apple slices in a decorative pattern, slightly overlapping, over the bottom of the pan. I like to start in the middle and work outwards. Whatever you place first will be what you see on top of the cake. Keep this in mind when arranging the apples. Set the pan aside. Cake Batter:
Cream the butter with the granulated sugar. Beat in the yolks and the vanilla. In a separate bowl, whisk together the dry ingredients (flour, powder, soda, salt). Add half of the dry ingredients to the mixer and blend until barely combined, then add the sour cream, blend until barely combined, then add the remaining dry ingredients and gently mix/fold until everything is mixed but do not over-work the batter. Spoon the batter over the apples and gently spread with an offset spatula, ensuring the apples stay in place. Bake for 35-40 minutes or until the top springs back when gently pressed, and a skewer inserted into the cake comes out clean. Run an offset spatula around the outsides of the cake pan and invert the pan onto a cake stand or other serving platter. Allow the pan to sit on top for a minute or two before lifting off. If any apple slices remain in the pan, just gently remove them and place them back on the cake where they are missing. Serve warm or at room temperature, with toasted walnuts (Spread 2/3 cup (66g) walnuts onto a tray and bake for about 7-9 minutes, stirring once to ensure even toasting) and Bourbon Whipped cream:
Happy Thanksgiving :) ~Lari 2023
0 Comments
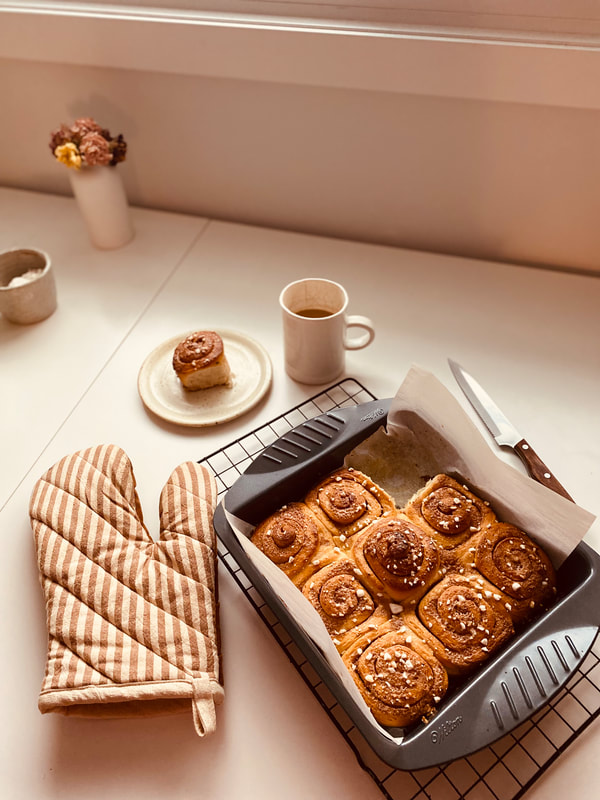
 A delicate cousin to the classic rich and fluffy cinnamon roll, these are sweet without being overly tooth achingly so, and a lovely hint of cardamom to welcome fall baking into our kitchens. I've put off making these for so long because I wanted to get Pearl Sugar to top them with... the classic European/scandinavian garnish for many sweet bread products. But then I realized that I had the resources to fabricate my own... I took some very large chunky white sprinkles that are pretty much inedible in their natural state due to the fact they are just huge lumps of hard white tooth-breakers. I wasn't using them. Suddenly I realized, if I just bash these up into smaller pieces... I have pearl sugar! Boom. 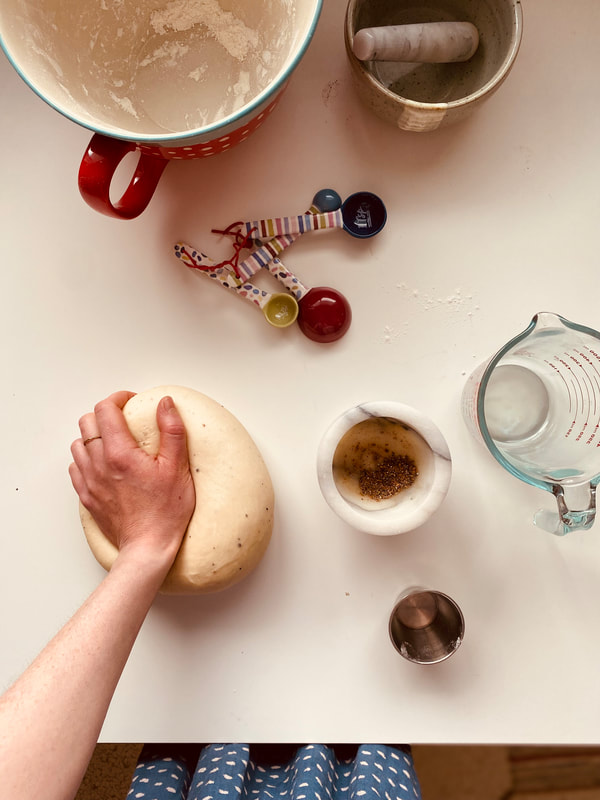 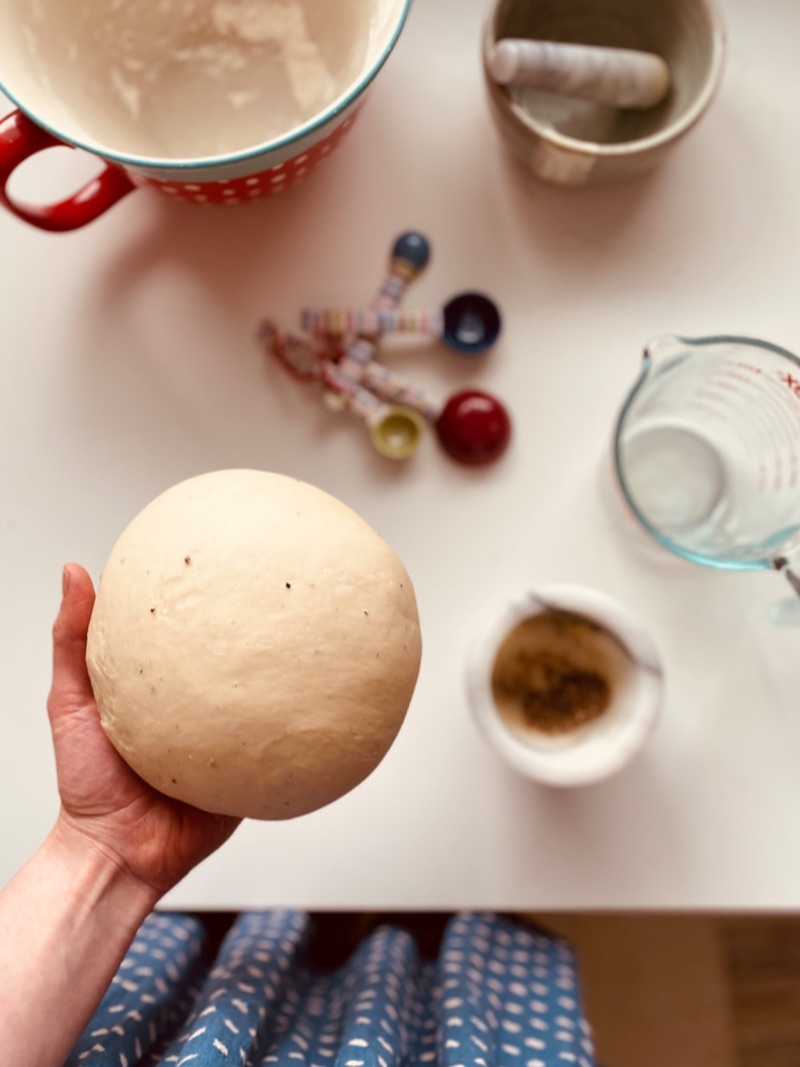 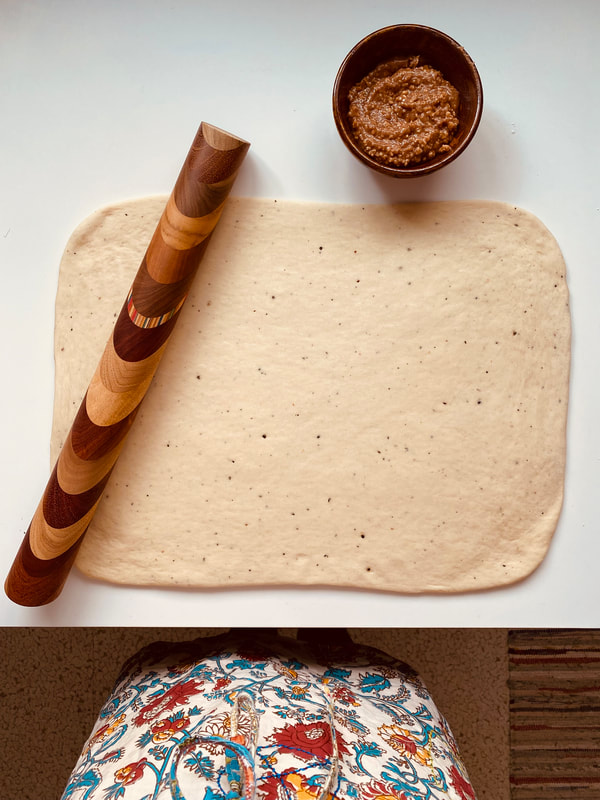 I truly adore marzipan, I am now making a vow to use more marzipan. To make ground cardamom, simply buy whole green cardamom pods and whiz them up in a high powered blender. This will be far fresher and superior than buying pre-ground cardamom at the grocery store.
  Cardamom Marzipan Cinnamon Rollsrecipe from the Ikea FIKA cookbook makes about 20 buns for best results, all ingredients should be at room temperature For the Dough:
How To:
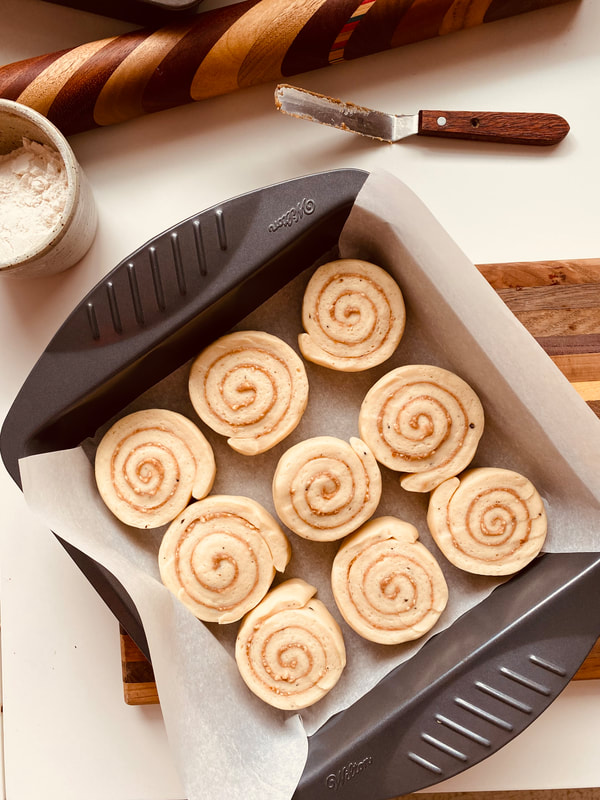
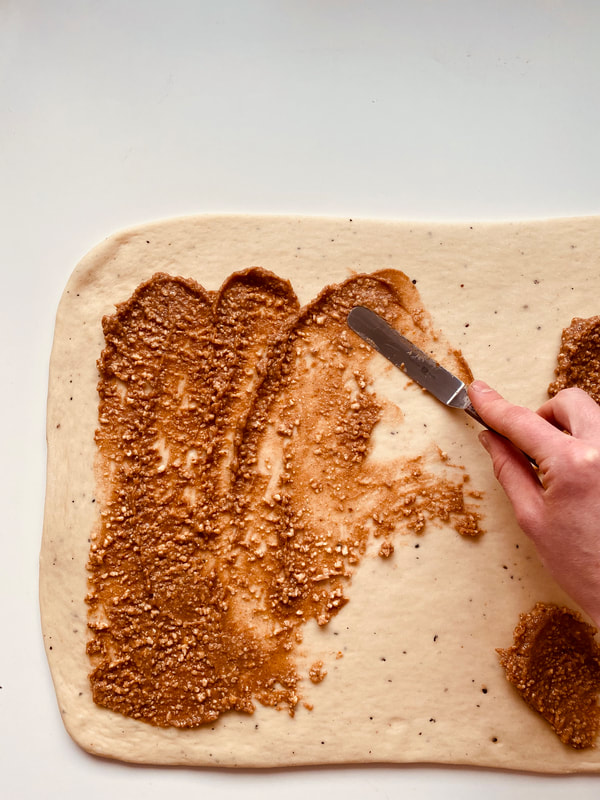
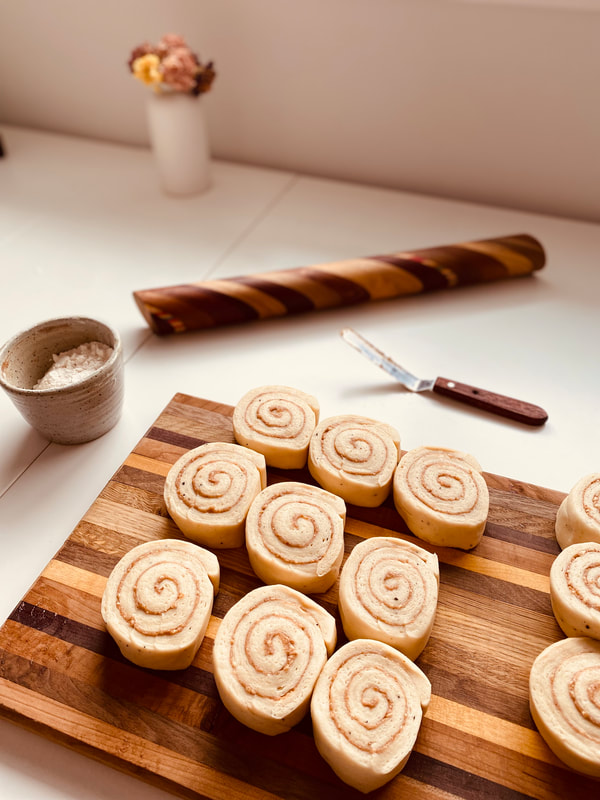
Crumble the yeast into the bowl of a mixer. Pour over the milk (either have the milk at room temp, or gently heated to lukewarm, about 37˚C or 100˚F) Start mixing or stir until the yeast has dissolved. Add the flour, the butter in pieces, sugar, eggs, salt and cardamom. Work the dough until it is very smooth and elastic, takes up to 10 minutes or so! If you live in a humid climate you may need to add more flour. I live in Alberta, where it is dryer than dry, so I do not need any additional flour than this suggested amount. Round the dough into a ball and allow it to rise in an oiled bowl, covered with a damp towel. I like to place the bowl in my oven (that is turned off) because it is a nice quiet and peaceful and draft free zone, and potentially less dry than sitting out on my counter. Let it rest and rise for at least 30 minutes, or until it has doubled in size. Meanwhile, make the filling: break up the marzipan into chunks and combine with the sugar, breadcrumbs, water and cinnamon. Blitz in a food processor. Melt the butter, and process the butter in too. Place the dough onto a clean work surface dusted with a bit of flour. Roll out into a rectangle. Spread with the filling. Roll up the dough from the long side of the rectangle and cut into buns about 1 inch. Place into a baking pan lined with parchment, leaving room to allow them to expand. Cover and let rise until they are doubled in size, about 30 minutes. You can also leave them in your fridge overnight, and then take out the next morning and let them proof for an hour before baking, then breakfast is ready! Meanwhile preheat your oven to 375˚F Whisk together the egg, salt and water and brush the egg wash over the risen buns. Sprinkle with pearl sugar. Bake in preheated oven for about 20 minutes. Happy September, happy fall. Every year when the grocery stores suddenly stack their shelves high with tiny bite size versions of everyone's favourite chocolates and candies in preparation for spooky season I get STOKED. What a wonderful time to be alive! It seems that public establishments everywhere suddenly have not only a reason but perhaps an obligation to stick out bowls of free candy. And the public has not only a reason but an obligation to do their part by taking and indulging in such free tiny delicacies. I set all self control and logic on the shelf when it comes to halloween time. I normally wouldn't be eating candy bars everyday, but TIS THE SEASON and they are so small so just one can't hurt right? But just one never really seems to be thing. Oh well. THIS IS MY CHANCE.  This time of year is also terribly inspiring for me as a baker because I've had a looooong time dream of making my own homemade versions of halloween candy. Yet year after year passes and I somehow never set aside the time to do this. Well this year I changed that and I MADE the time. Twix bars were never my favourite halloween candy as a kid, but as an adult they have snuck right up there and I've realized that they are like tiny versions of "millionaire's shortbread"... which is one of my favourite treats to bake/eat!!! So I knew I had to make homemade Twix bars a reality! But once I get the ball rolling it's hard to stop and suddenly I'm thinking, what if we somehow incorporated PUMPKIN into this candy classic... and soon with a bit of research and recipe mish-mashing and kitchen tinkering I have successfully created the "Pumpkin Twix Bar" that I am proud to share with you today!! Don't let your dreams be dreams! I quite like these little guys. They feature a shortbread-cookie base that is spiced with the all familiar "pumpkin pie spice" (use a blend of cinnamon, nutmeg and ginger if you don't have a pumpkin pie spice blend kicking around). The filling is just as I was hoping for... a chewy caramel that is not rock hard and impossible to bite, but not too soft so that it oozes everywhere and looks messy. No, this caramel holds its shape but gives way when your teeth sink into it. For best results though, serve this at room temperature. I especially love to sprinkle the top with toasted pumpkin seeds and flaky sea salt... to show that these ain't your ordinary twix bar... and also to balance out the sweetness from the caramel. Enjoy!! 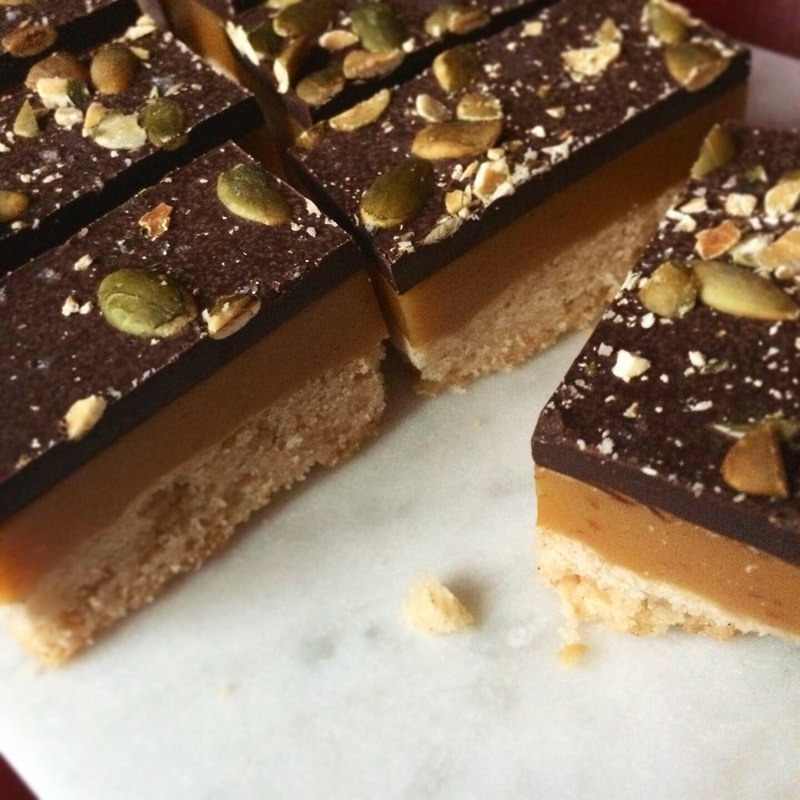 Pumpkin Twix BarsRecipes adapted from "Tastes Better from Scratch" and "Challenge Dairy" Shortbread Base:
WARNING these cupcakes are dangerously sweet but sometimes you just need that hard core sugar hit. Brown sugar is the star here and when combined with a healthy amount of butter and cream (and most importantly SALT to balance all that sticky sweetness) we have a tasty treat for you. 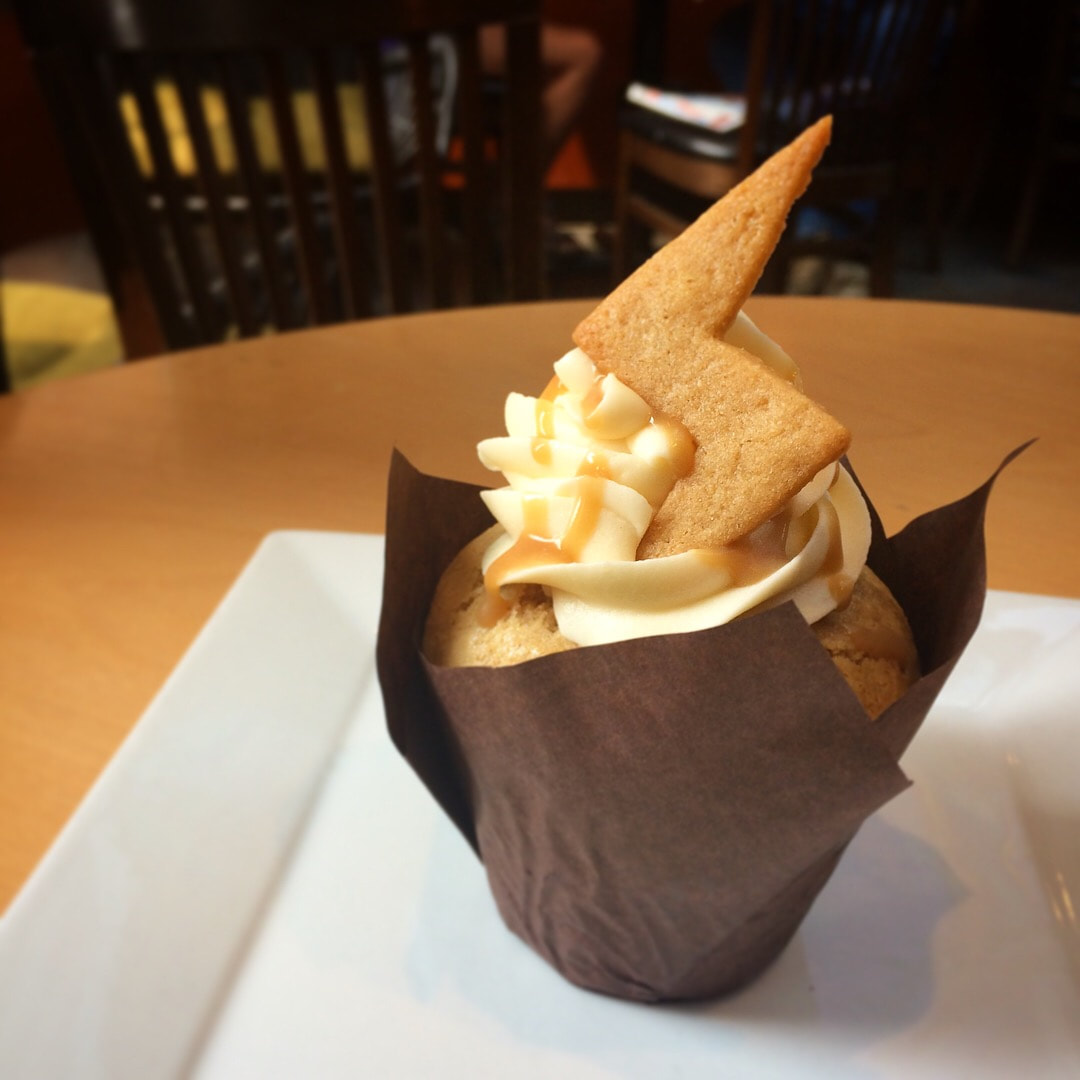 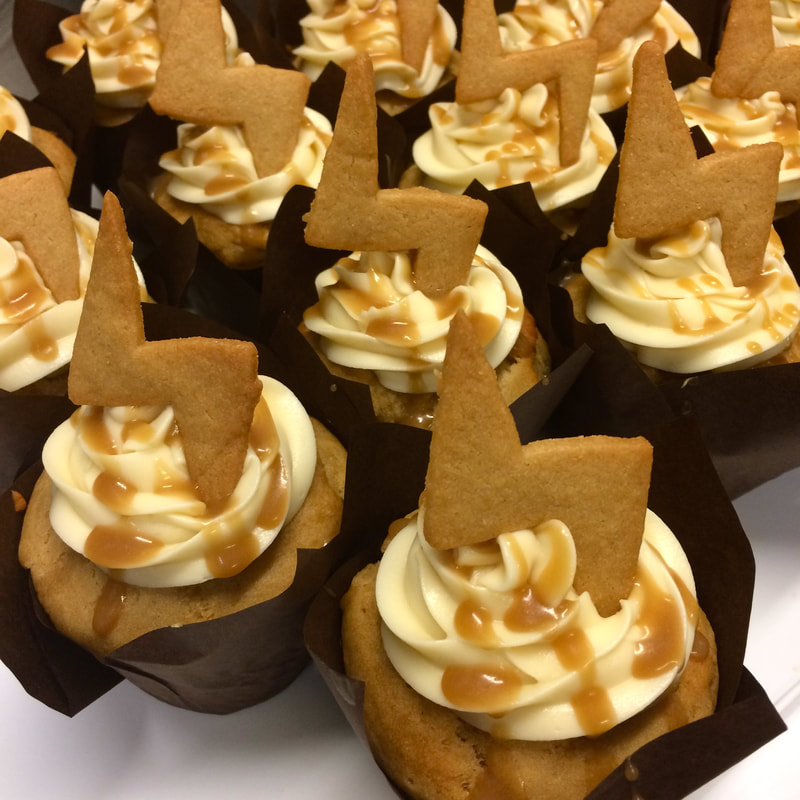 These cupcakes came about when I wanted to make a Harry-Potter-Butterbeer-type of cupcake for the cafe where I work (hence the lightning bolt garnish). I made way too much butterscotch sauce the first go-round so I got to make the cupcakes again for halloween, this time with lil ghosts on top! I giggled a lot while decorating each one with tiny edible googly eyes... which I now want to put on everything. 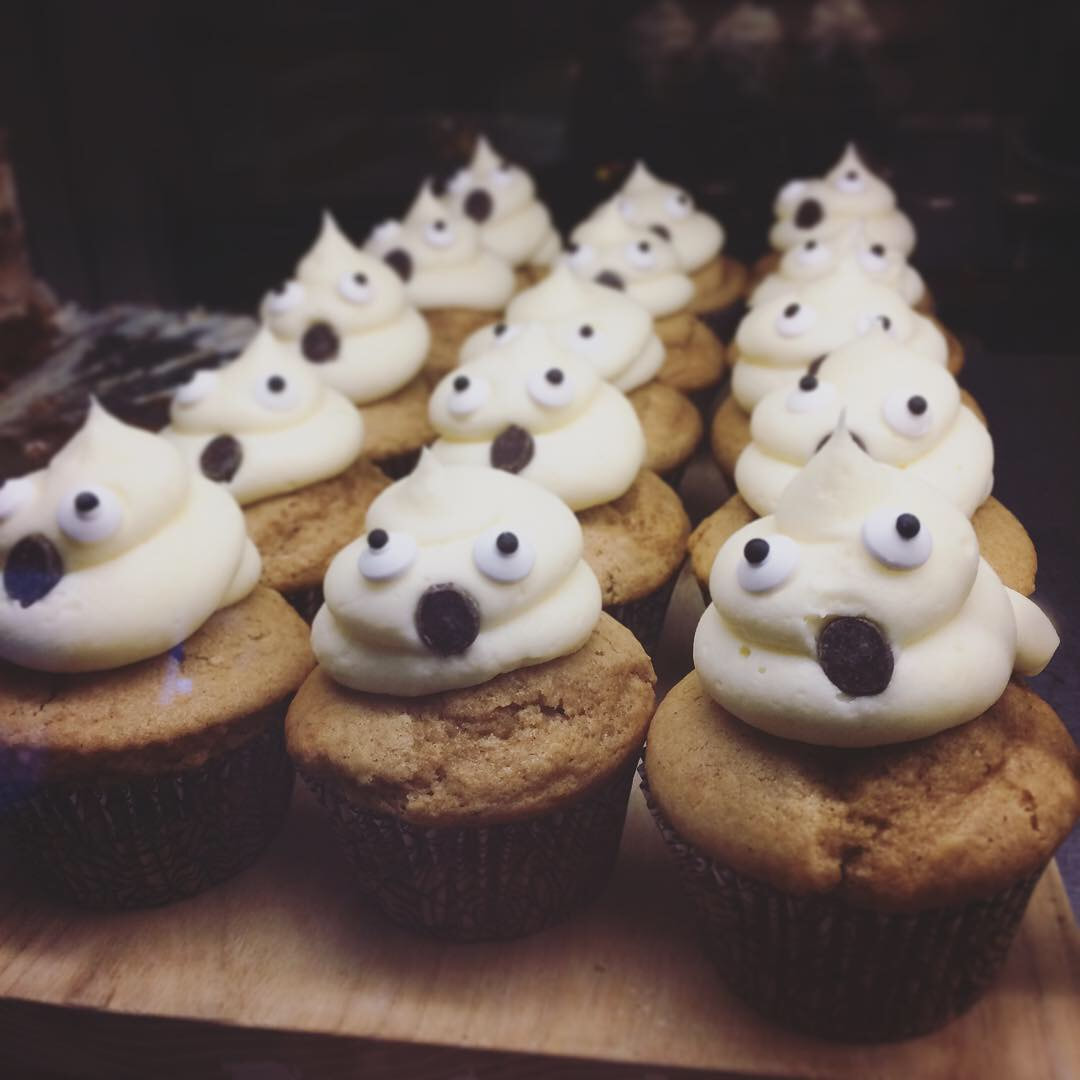 Butterscotch CupcakesThe cupcake recipe makes a delicious brown sugar cupcake all on it's own, if you don't want to go the extra sweet route of filling them with the butterscotch. I've been known to add a teaspoon of cinnamon to the batter which I think makes them even better! Brown Sugar Cupcakes:
*I hardly use a recipe for cream cheese frosting these days... rather I tend to use a ratio of approximately 2 parts cream cheese to one part butter, and add powdered sugar to taste. A good pinch of salt helps to balance out the super sweet powdered sugar, and vanilla makes it extra tasty. Follow your heart, but a good starting point is:
Butterscotch Sauce: Again, this will probably make more than you need for the cupcakes... the leftover can be used in hot drinks, drizzled on cakes or as a tasty ice cream sundae topping!
Two things I love most in life: Fresh Muffins. Fresh Hair do's. Yesterday both of these occured within the same morning... and life was glorious 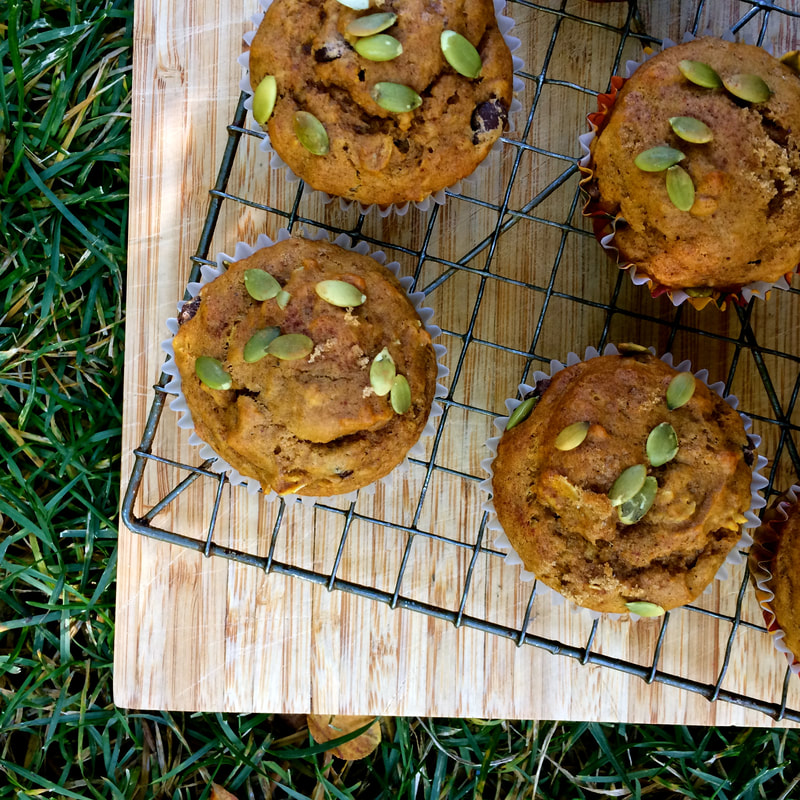 Fall is sort of like spring in that there is a feeling of renewal in the air. It's hard to deny. When the world around you is changing colour, you can't help but feel like you should change a bit too. Suddenly I find myself inspired to clean out forgotten drawers, organize my closet, start a new project, refresh my look... My tastebuds crave all the warm spices, but my heart and soul also desires to spice things up a bit... I finally did a thing I have been threatening to do for a few months now... I went WILD and got my hair permed. My inner grandma is so content right now.
There is nothing quite like a new hair-do to put a new spring in your step. Or in my current case, a spring in your hair (Sorry not sorry). Although I am still not used to my reflection, and admittedly can't help myself giggling every time I look in the mirror... I am pretty happy with my new curls! Even though I am not going back to school this fall I still feel like I want a fun fresh start. So why the heck not?! Yes, a new season, a new look, a new Lar. I do love the fall. Spice it up! That's what fall is all about #amiright? 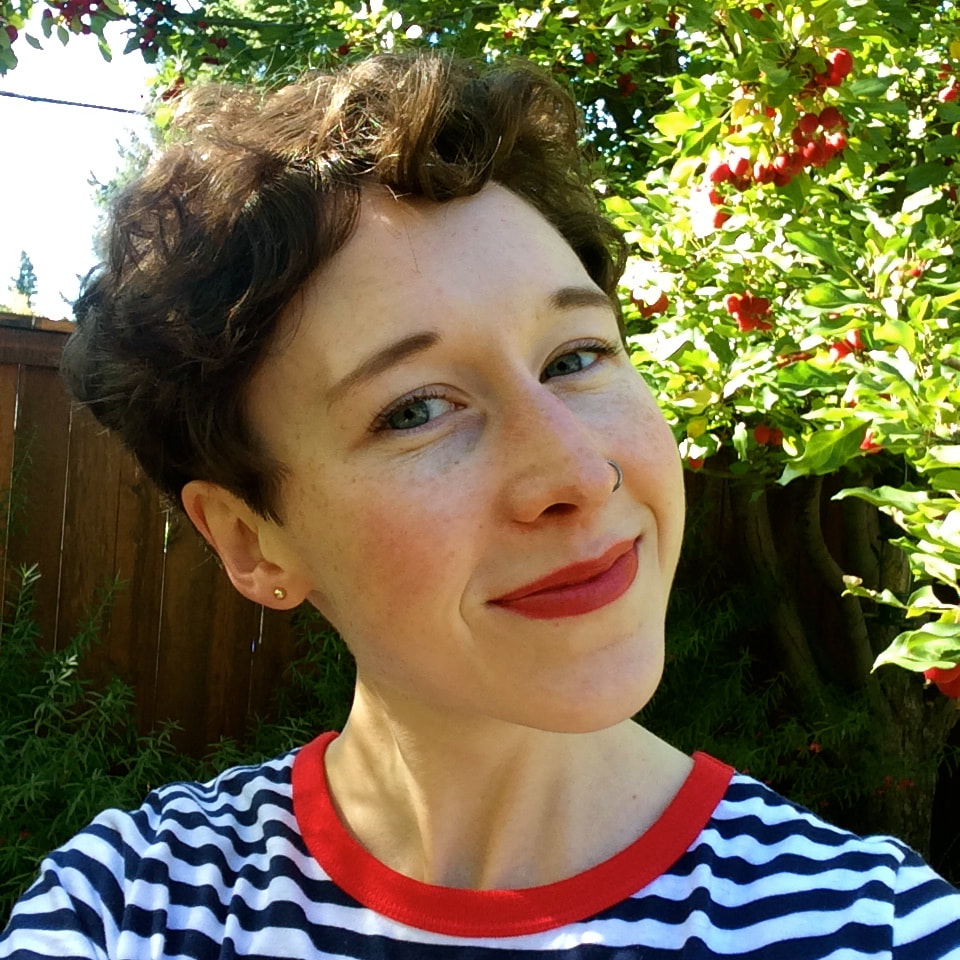 More importantly however, fall is about PUMPKIN EVERYTHING 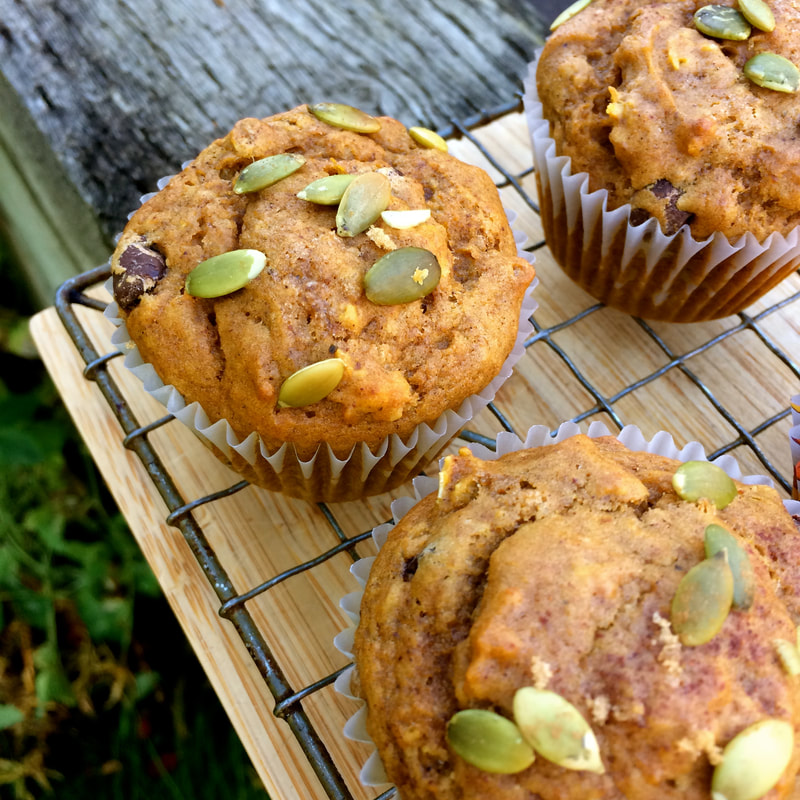 Hence I made these pumpkin muffins which are soft and fluffy and spiced with all the happy spices and studded with chocolate because CHOCOLATE and crowned with pumpkin seeds to make them pretty. I brought some to my hair dresser which I think helped her to forgive me for showing up late... Note to self, if you're gonna be late, at least bring muffins. Also known as, nobody notices your flaws if you distract them with fresh baking. This is how I get through life. Here's to the pumpkin-spice-curly-perm life. Amen. 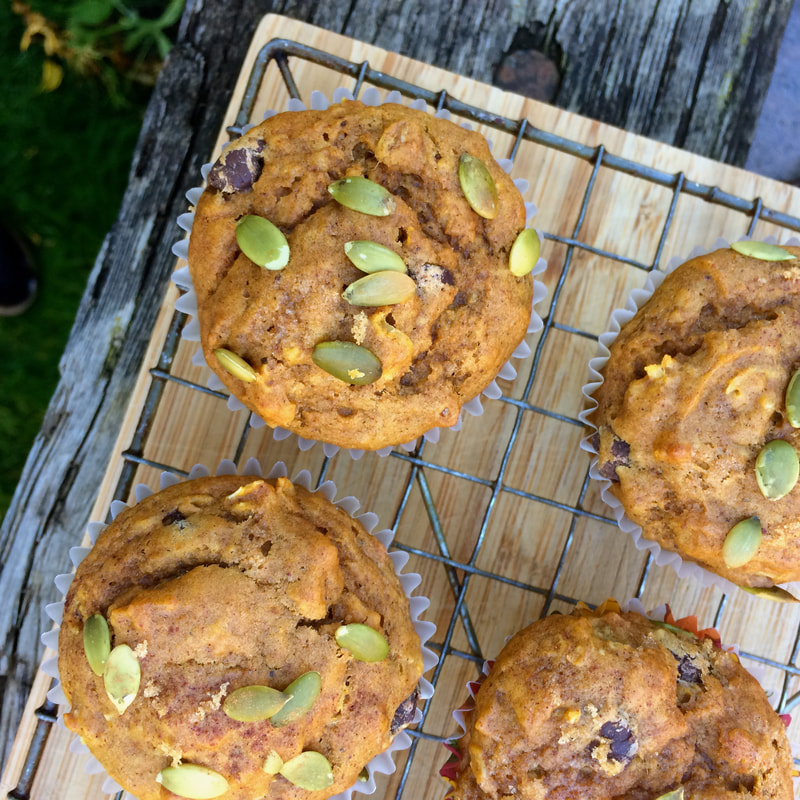 Pumpkin-Chai-Chocolate-Chip MuffinsRecipe from Renee Kohlman (Sweetsugarbean) and her wonderful book: All The Sweet Things {makes about 12-14 muffins}
WET ingredients:
|
Tiny Tea PartyIt's about celebrating the tiny things. Categories
All
© 2015 Larissa Costella
All Rights Reserved (All images and content are my own unless otherwise noted) |
 RSS Feed
