
|
This sounds like a problem that no one has, ever... but have you ever found yourself with half a bottle of champagne that needs to be used? Perhaps it was from the night before, it was opened and tragically never finished, never realizing it's full destiny? Perhaps you worked as a bartender for your community's annual wine night and they let you take home the opened half-full bottle of sparkling wine that was on offer? This would be exactly the predicament I was in recently, and although this kind of issue is probably not a frequent one, if you ever find yourself in such a predicament, I do have a possible solution. CAKE! Yup, this is a bottle half-full situation my friends, bottle half-full. 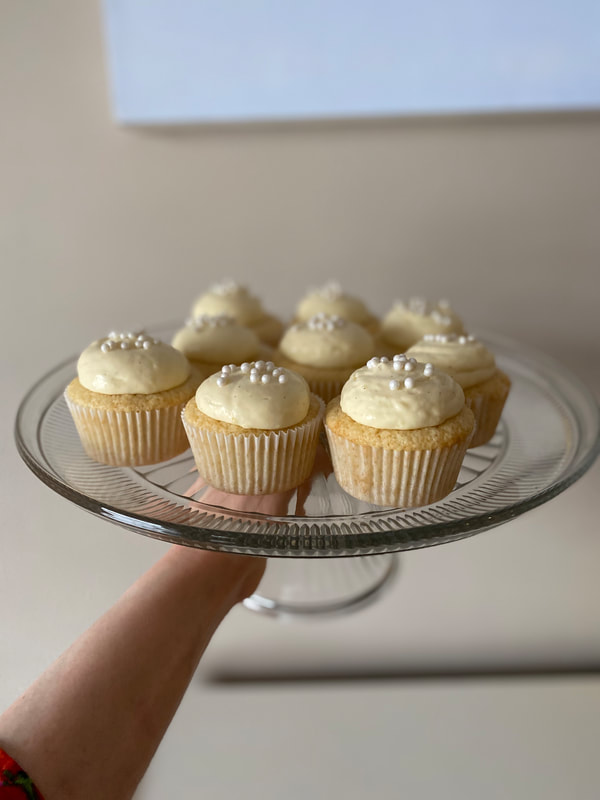 I could envision these pale cuties at your next gals-night-in party, or a dessert offering at a cocktail party, or just to adorn your mid-winter kitchen counter with some much needed cuteness. These came about because my aunt sent me an article that gives a different cupcake for every month of the year, and this one of course is for January! And wouldn't you know it I was blessed with a (FREE) open bottle of champagne. So, it was meant to be, Wouldn't it be fun if I followed along all year? I'm really awful at following through with these sorts of things however... so the chances are low and certainly no promises. BUT, for now, a toast to January! The month of cold cold weather and leftover alcohol. In the form of tiny cakes.  Champagne-Vanilla CupcakesRecipe from Food Network Magazine Cupcakes:
1/2 cups leftover champagne or other sparkling wine 1 tsp vanilla extract 1 cup all-purpose flour 1 1/2 tsp baking powder 1/2 tsp kosher salt 6 tbsp butter (3 ounces) at room temp 3/4 cup sugar 1 vanilla bean split lengthwise and seeds scraped out (reserve the pod for the frosting) (OR splash of vanilla extract or paste cuz times are tough and beans be expensive) 1 egg, separated. Preheat your oven to 350˚F Line a 12 cup muffin pan with paper liners. If your champagne is still bubbly, pour it into a bowl and whisk until the bubbles dissapate. Although I might suggest that if it is still bubbly, it would be much more enjoyable to drink, and you should make these cupcakes with the flat-and-forgotten leftover wine. combine 1/2 cup of the champagne with the vanilla extract in a small bowl and set aside. Reserve the remaining champagne for the frosting. Whisk the flour, baking powder and salt in a medium bowl, set aside. Cream the butter and sugar and vanilla seeds until light and fluffy, about 5 minutes. Add the egg yolk and beat until smooth. Reduce mixer speed to low and add in the dry ingredients in two batches, alternating with the champagne-vanilla mixture, beating until just combined, and no more. In a separate bowl, whisk the egg white to stiff peaks, then fold into the batter. Divide the batter among the prepared tin, filling each paper about 2/3 full. Bake until the tops of the cupcakes spring back when gently pressed., about 20-25 minutes. Let cool for 5 minutes in the pan, then remove to a wire rack to cool completely. Champagne Custard Frosting 1 cup champagne 2 tsp gelatin powder 1/2 cup sugar 1/4 tsp kosher salt 4 egg yolks 1/2 cup heavy cream Put about 1 1/2 tbsp of the champagne in a small bowl and sprinkle the gelatin over the top and leave to sit for 5 minutes to allow the gelatin to soften. Whisk the sugar, salt and yolks in a small saucepan until smooth. Whisk in the remaining champagne (and add the remaining vanilla bean pod if used from the cupcakes) Cook over medium heat, stirring until the custard is thick enough to coat the back of a spoon, 3-4 minutes. Pour the hot custard through a fine mesh sieve into a large metal bowl. Discard the vanilla pod if it was used. Add the softened gelatin and stir until dissolved. Refrigerate the custard, stirring every 5 minutes until it is the consistency of soft whipped cream. Whip the cream in a separate bowl until firm peaks form. Fold half of the whipped cream into the custard to lighten, then fold in the remaining whipped cream until fully combined. Chill again if it is too loose, stirring frequently until it is pipeable. (I didn't have to chill it any further) The custard will begin to set at this stage, so get it into a piping bag fitted with a large round tip. Pipe big dollops of frosting onto each cupcake, and decorate with pearl sprinkles if desired. Allow the frosting to set on the cupcakes in the fridge. Share and enjoy these classy cupcakes. CHEERS!
0 Comments
Here in Cow Town it's been averaging at about -25˚C for the last week or so... it's time for some TROPICAL TREATS I say!!! ENOUGH OF THIS COLD.  These zesty bars will trick you into thinking you are on a beach in Mexico, sipping a paloma, with your bare feet tucked into soft warm sand... when in reality I have spent too many minutes waiting for the bus outside and despite my desperate attempts to keep my feet warm by wearing my (ugly but warm) clompy snow boots, I still managed to get frostbitten toes for which I have lost all feeling... where was I? Oh yes, eating our feelings through the power of citrus! (and tequila, that helps too) 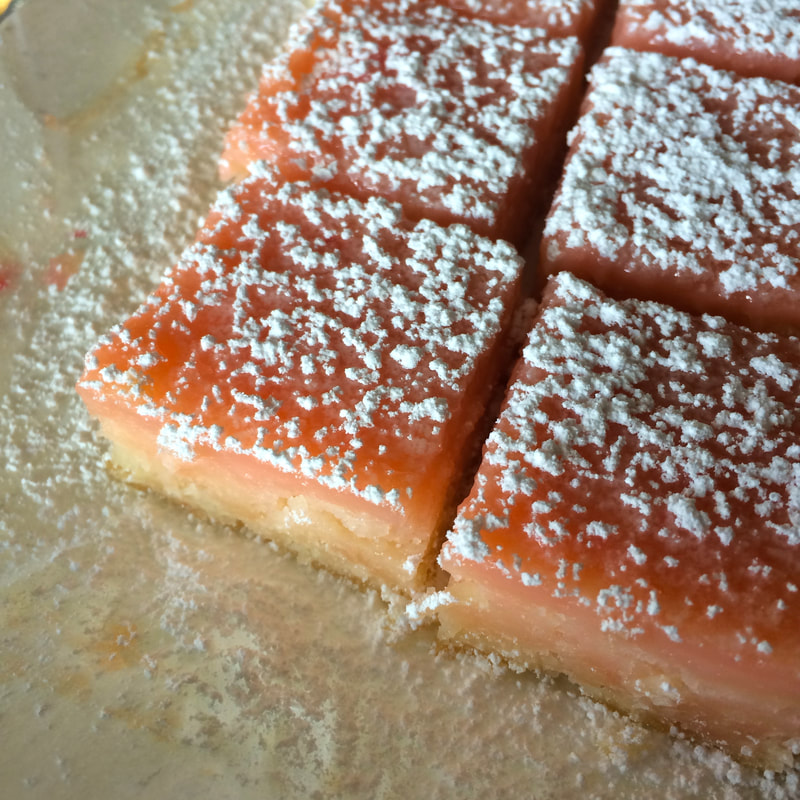 This recipe was born out of a desire to make lemon bars... However, not having any lemons, nor the desire to venture out to the grocery store for only them specifically. What I did have sitting around in my fridge needing to be utilized was grapefruit and lime, leftover from the recent grand Paloma Cake adventure. If one can make lemon bars out of lemons, then surely one can make Paloma bars out of grapefruit lime and tequila!!! Right? Throw in some coconut because YUM! and we have ourselves a tropical treat to make us forget about winter for juuuuuust a second. It's slightly more affordable than actually going to Mexico, which is what my parents did for this month, smart people, I tell ya. This is as close as I'll get. 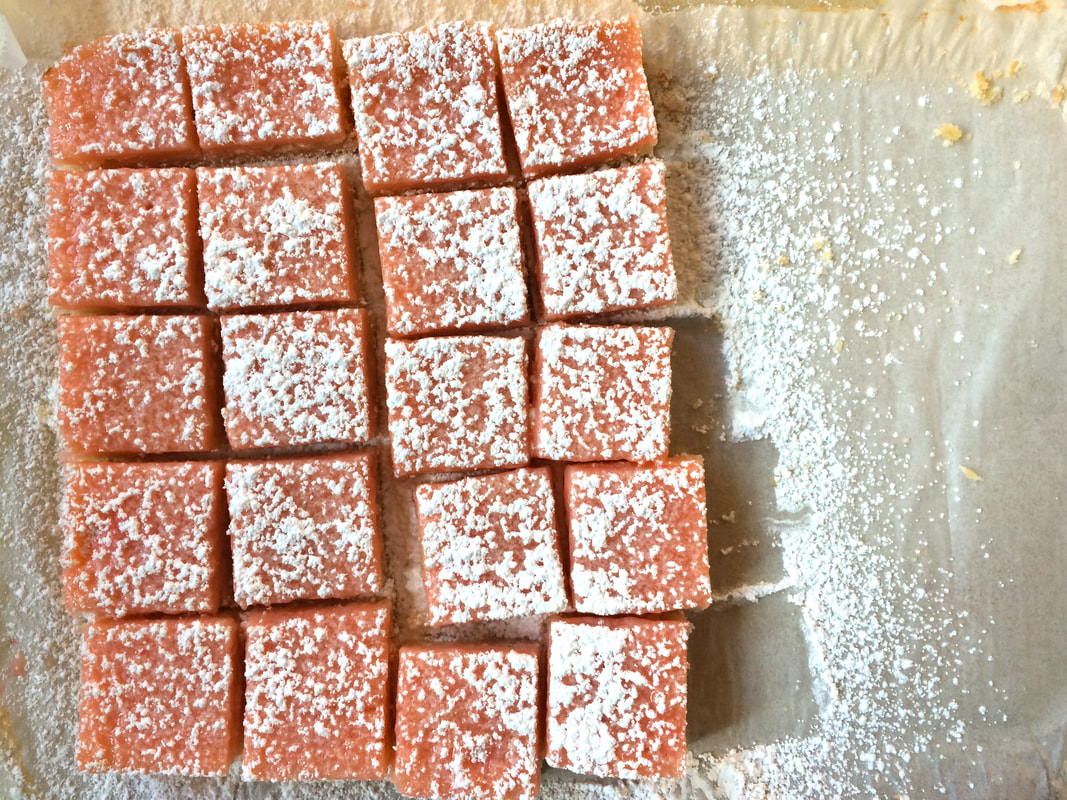 Paloma Coconut SquaresRecipe adapted from Martha Stewart for the base:
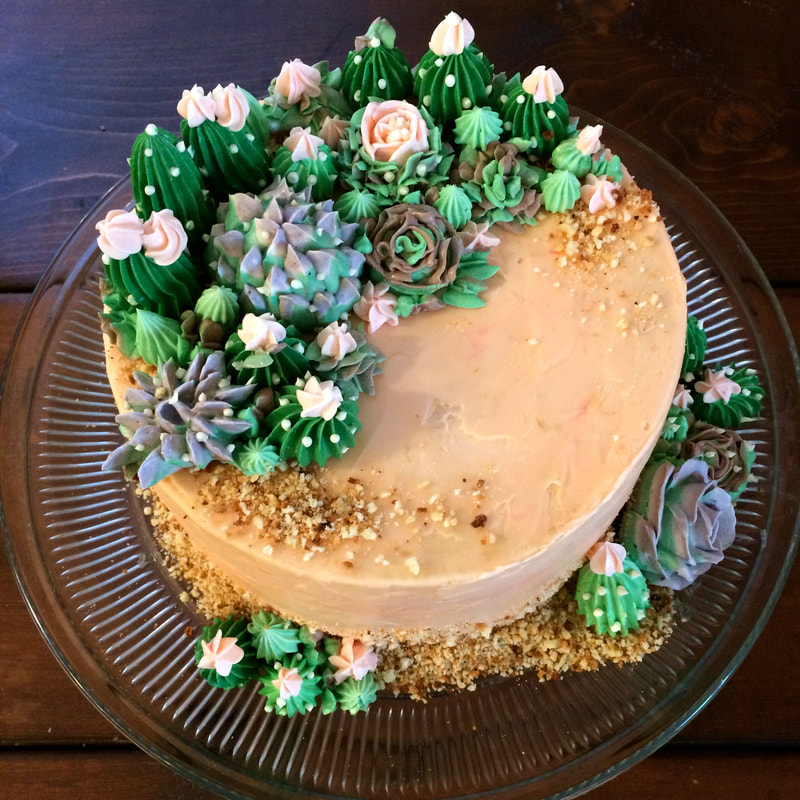 For the sake of cakeI love cake! The strange part about me saying this is that I think eating cake is all good and fine, however I would probably rather eat cookies, cuz I am a COOKIE MONSTER and that's just me. Give me a choice between a chunky cookie or a slice of elegance and I will pick the cookie nearly every time. I could instead re-phrase "I LOVE CAKE" to a more specific "I love the concept of cake!" I love the way cakes look, how they are symbols for PARTY and CELEBRATION. They are food of happy times and meant to bring joy. I could also say "I love the act of making cakes", as it is an art form all on it's own!!! Cake decorating is one of those areas in life where the worlds of pastry and fine art collide... and it's a weird and wonderful zone. I've realized however, that I spend a lot of time looking at pictures of cakes and thinking about making them, more than the actual act of making them. I have learned and read enough to know how certain cakes are produced and the various fascinating techniques that are used. But, I haven't had much practice in actually making them. It's time to stop being the naive viewer in the art gallery saying "I could do that" and to actually get out there (or stay at home) and actually JUST DO IT. My problem is that I seem to be always waiting for the right occasion for which to bake a cake, because I have this mental block that says: you need an occasion to bake a cake. What if we flipped this? What if the opposite became true? What if... the cake created an occasion for itself? The cake is the cause! (Tiny epiphany, cue tiny fireworks and explosions of inspiration). I need to make time for cake. Resolution: Stop waiting for an occasion and just bake a darn cake. For the sake of cake! Try new techniques! Make ugly messes! Because this is how we learn things. My goal for 2019 (this is dangerous, now that I am officially announcing it as a goal,) is to each month make one cake, using a baking or decorating technique that I have never tried before, or one that I need more practice with. I figure this will be fun, because cake is fun. It's like painting or any other hobby, only you can eat it. If I mess up, it's just cake. I will be learning and growing as a baker, and I will have delicious treats to share with family and friends. Please help me eat all this cake that's about to happen. 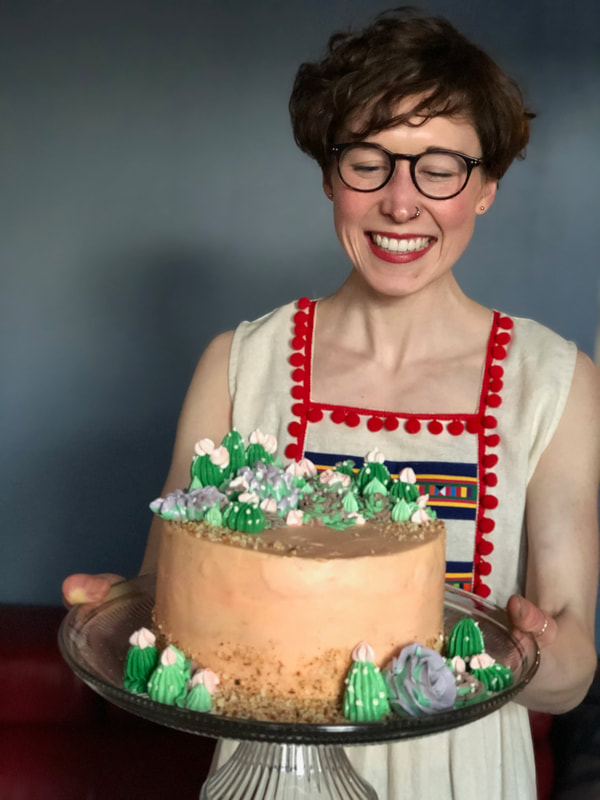 January: A cake for a FiestaIt's 2019, it's a new year, it's a new dawn, it's a new day! And... I have a new home! Naturally, my roomies and I wanted to throw a housewarming shindig to make things official, and to brag to our friends/show off our new digs. After rejecting my suggestion that the party be themed "House" or "Warm" (appropriate, yes! But also lame? kay fine) we very quickly agreed to having a fiesta themed housewarming party. My favorite theme. And so with this in mind, along with the long-time desire I've had for wanting to make succulents out of frosting... I designed the Paloma Cactus Cake! 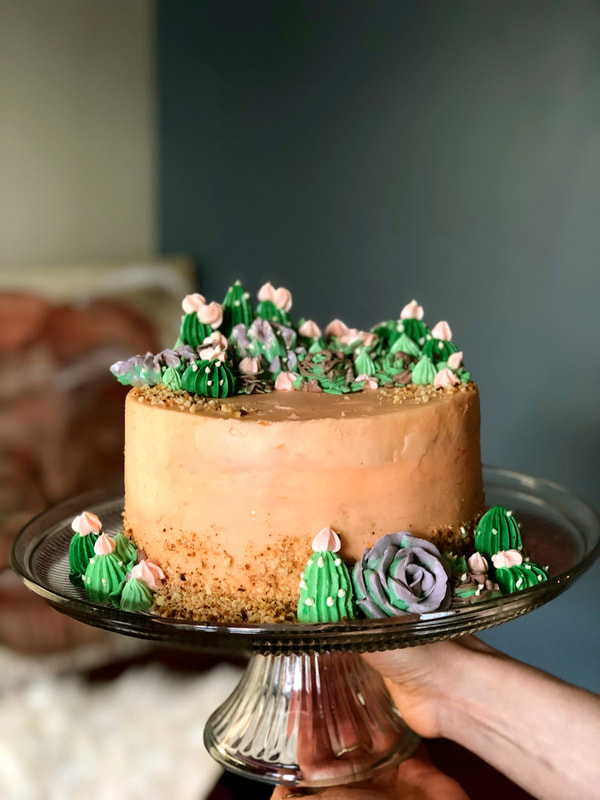 If you are thinking "What in tarnation is a Paloma?", let me tell you... Firstly, it is amazing. A Paloma is a cocktail with a fun name and even more fun ingredients: tequila (my spirit-spirit), grapefruit and lime. SO, I wanted to let these flavours set the stage for my fiesta-party-cactus-cake. This is a triple layer cake, using grapefruit and lime zest and juices AND TEQUILA to flavour the sponge and the frosting. To really bring it home, I (generously) soaked each cake layer with a dousing of tequila-grapefruit-syrup. This adds flaaaayyyyve and helps prevent the dreaded dry-cake-phenomena. Between the layers is a grapefruit curd, then the whole shebang is frosted with paloma frosting, and decorated with little buttercream succulents. I giggled a lot when making these tiny guys cuz they're just so darn cute! Buttercream decorating like this takes a decent amount of time and preparation and makes a decent sized mess. However, being able to pipe the succulents then keep them in freezer until you are ready to decorate makes life that much simpler and tidier. And remember the golden rule of kitchen: clean as you go. The "sand" crumbs that you see are made from leftover cake scraps that I toasted until crisp in the oven, snacked on a few, then blitzed them up in the food processor. Definitely room for improvement, but I'm pretty happy with how this first attempt worked out :) So glad I finally made the time to try this! If a grapefruit-lime-tequila cake speaks to your soul, then lucky you, here is the recipe! It tastes just as tropical without the tiny cacti, but they do make life fun. Happy Baking! Paloma Cakerecipe from Wilton
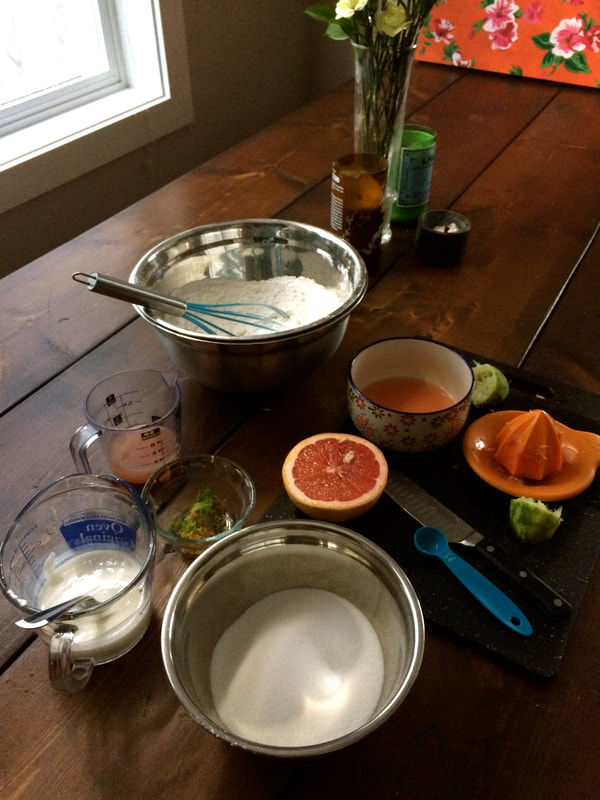 Paloma Frostingrecipe from Wilton *note:when I made my cake, I only used half this recipe of frosting, and it worked, however I had absolutely none left over and probably could have used a little more to cover the sides of my cake better. If you want to be safer and have some frosting leftover, use the full recipe.
Grapefruit CurdRecipe adapted from Martha Stewart
CAKE ASSEMBLY!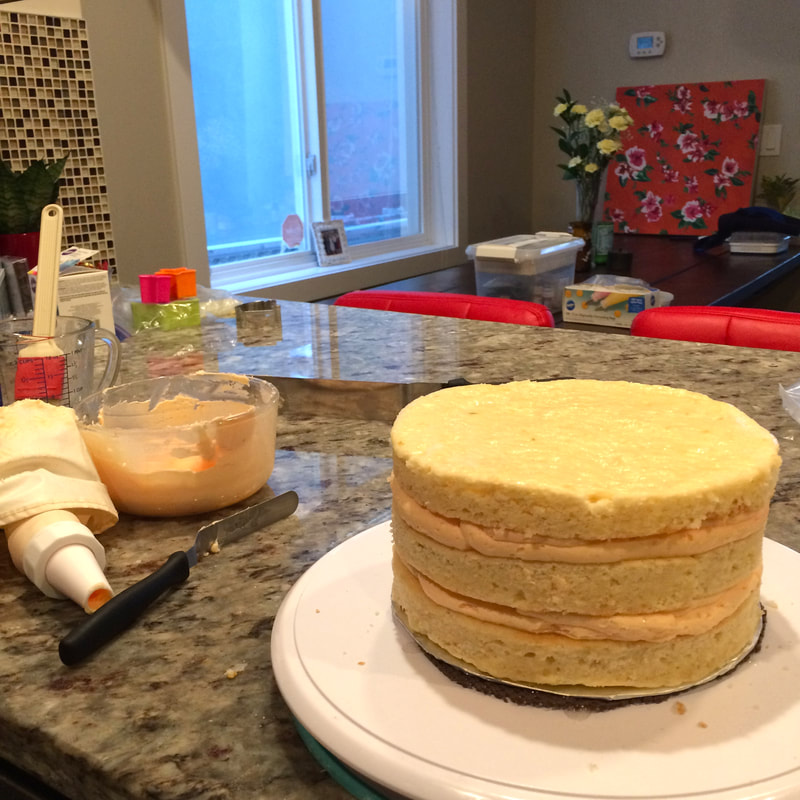
 Buttercream SucculentsSwiss meringue buttercream is my favourite for piping, because it is so silky smooth. Below is a favourite recipe of mine that has the addition of white chocolate, which I believe does two wonderful things: helps stabilize the buttercream, and also helps it taste delicious. You can use your own buttercream recipe if you have one you like, or you can even use the paloma frosting if that feels simpler, however you may have to adjust the consistency by adding milk or icing sugar as needed. I liked the contrast of the two frostings on this cake, for their different appearance, textures, and flavours! White Chocolate Buttercream
I would be silly to try and leave instructions here, for I am certainly no expert on this topic. Instead, here is a link to a video that helped me as I endeavoured on this time consuming but deeply satisfying procedure: https://www.youtube.com/watch?v=vRTNu-8026k High five to Wilton, thank you! 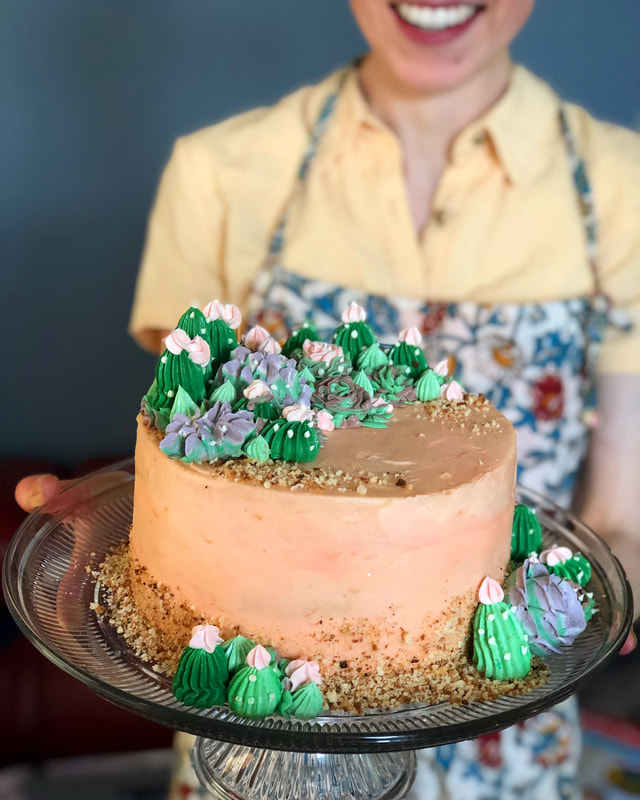 And there we are! Easy right? Get ready to make a mess :) Speaking of which, I can't help but include this beautifully grotesque image of the cake-eating-aftermath: 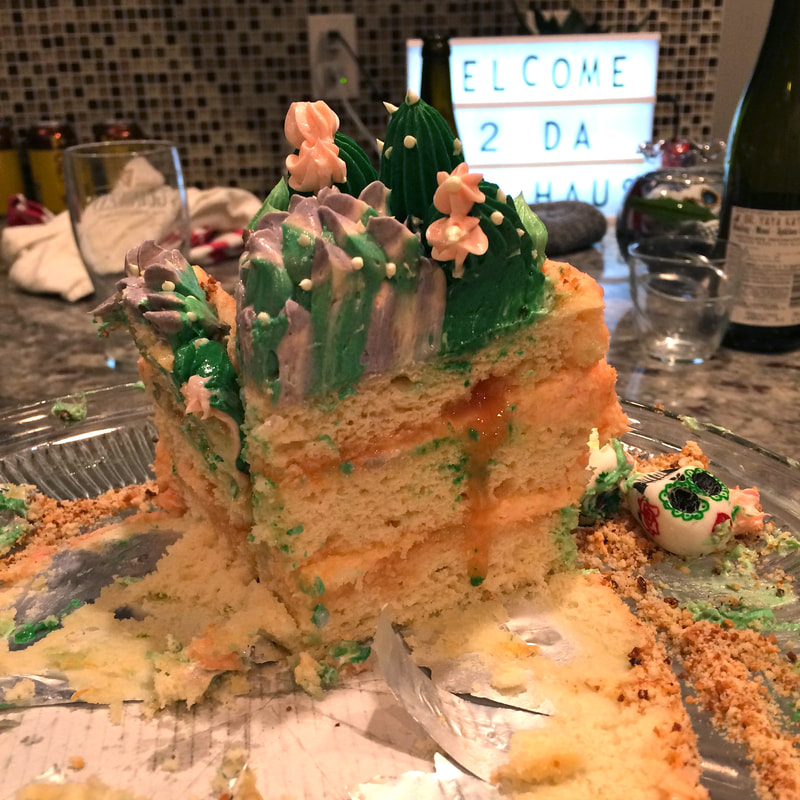 Nobody wanted me to cut into the cake, however I am happy to report that it was worth it as the cake itself was in fact delicious as it was pretty. Yay for cake! We are off to a grand start.
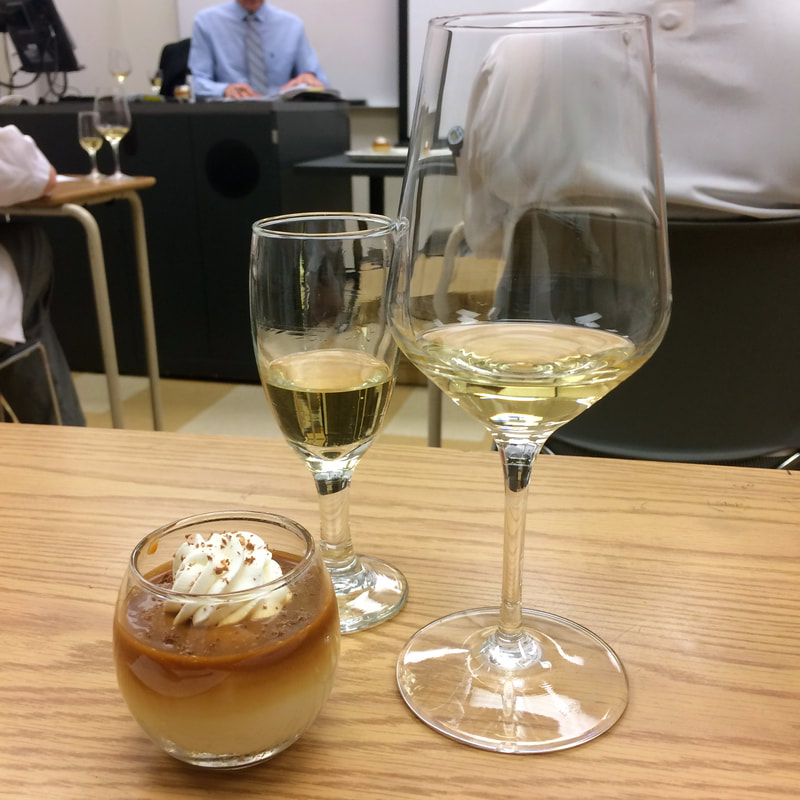
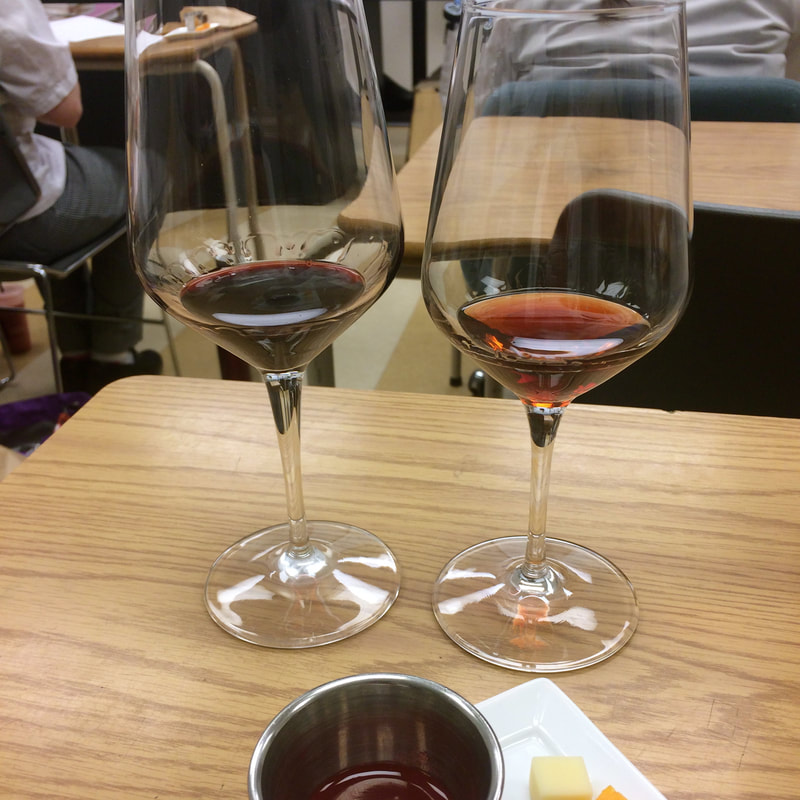
I'm in my very last semester of baking school, and doing my best to soak it all in and enjoy every minute... because I know that by the time it's all over I am gonna miss it! What a cool opportunity to get to learn from the very best chefs and bakers... nerding out about baking and getting to experiment and make SO many amazing and delicious things! It's pretttyyyyy incredible. 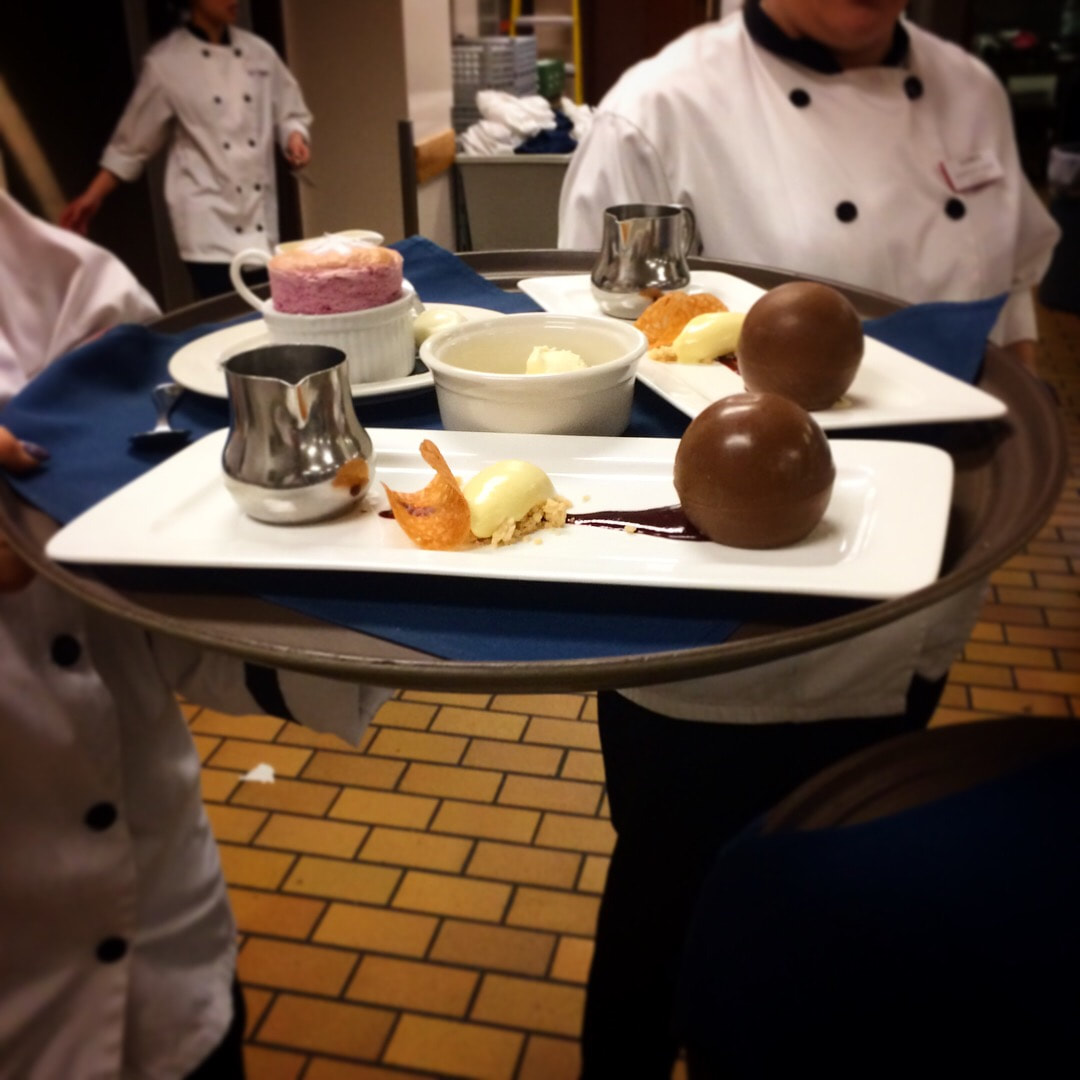 The past three weeks I took a class called "Plating and Pairing"... one that I was looking forward to most out of this whole semester. (even though I could say that about 90% of my classes). Here's a little peek into what went down over those three weeks, and a chance for me to review and reflect. Firstly, everyday at 3 pm we began with theory class. But this wasn't your average theory class. You can tell because most days when we walked into class you would expect something like this: 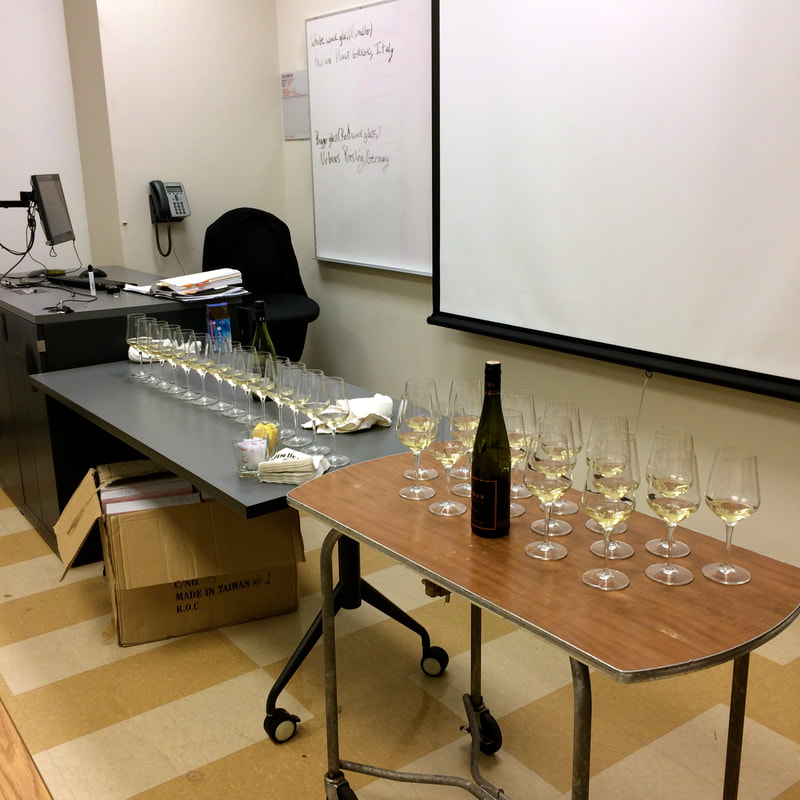 YUP! This was obviously the "pairing" portion of Plating and Pairing. We literally drank wine, ate desserts, and discussed why they did (or did not) pair well together. I learned a lot about wine tasting:
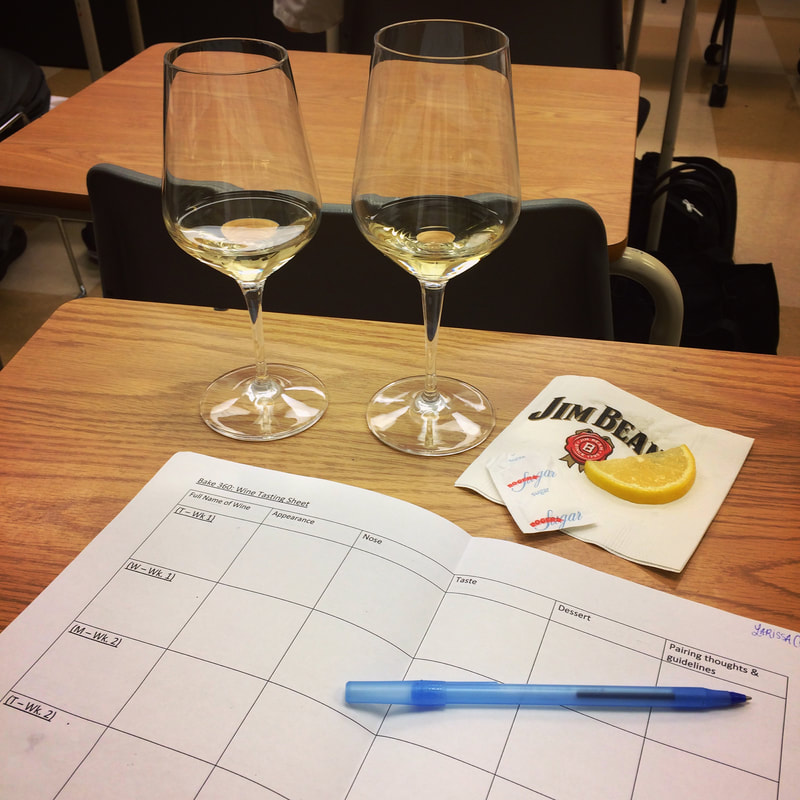 I also learned some valuable guidelines about pairing wine with dessert:
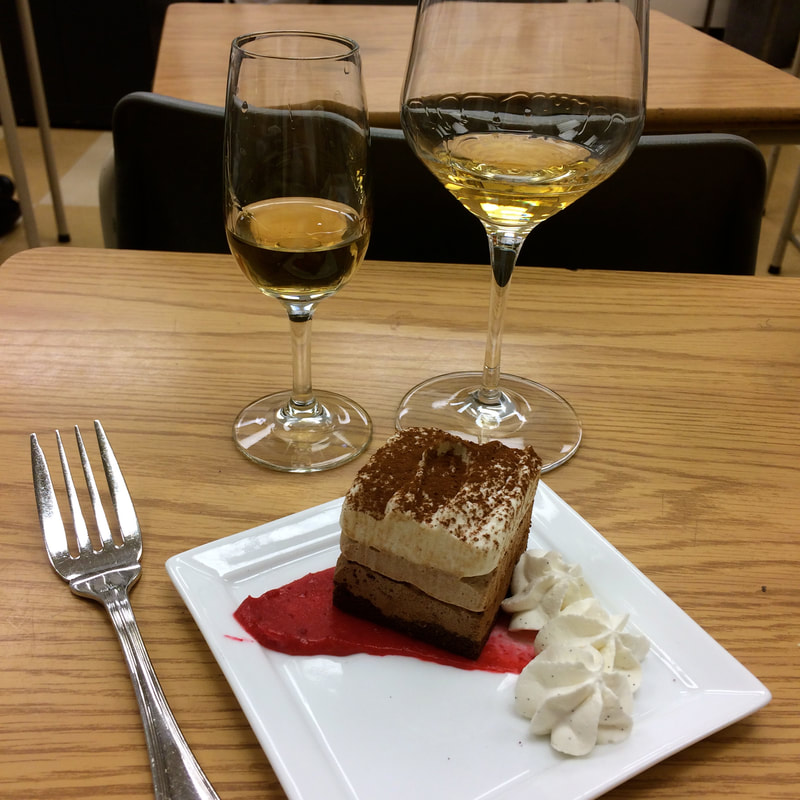
Just your average afternoon snack at school. One day we were even tricked into drinking straight whiskey! At first my body and mind were like "YEAH THIS IS FUN" but by the end of the three weeks I think I was looking forward to a change. Only because the catch is, after all these tastings in the middle of the afternoon, we would still have to stay up and finish the "plating" portion of the class with our Chef instructor. This took place at the fancy Highwood restaurant on campus, and would usually run until nearly 10pm, sometimes even beyond. As someone who is normally unproductive anytime after 8pm,and generally in bed by 9pm, this was my great challenge. 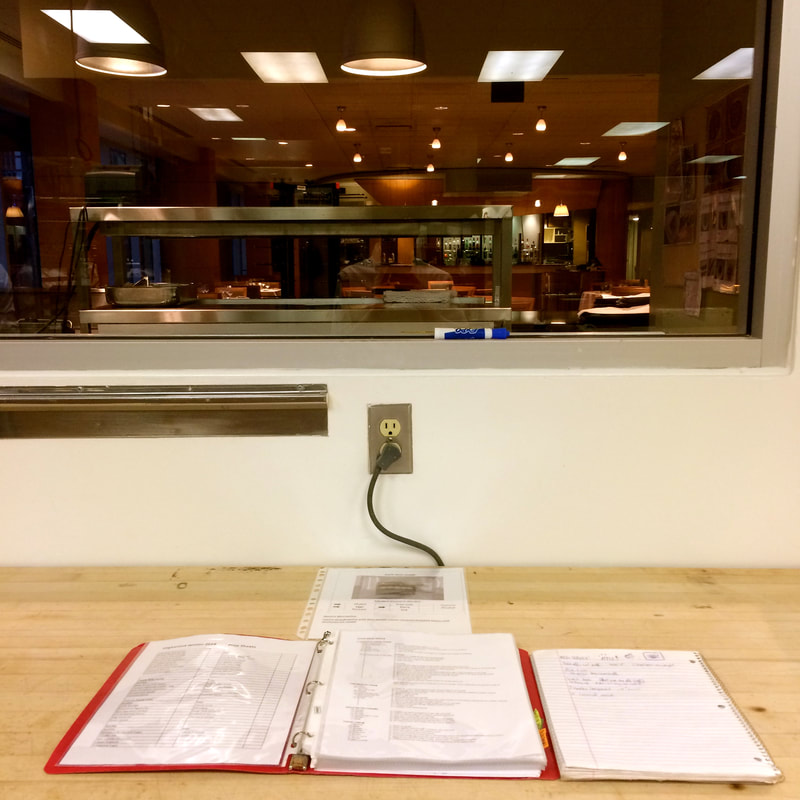 BUT ONE I WAS UP FOR! I was so eager and excited to get to do fancy plating in a real restaurant for real guests, learn some new recipes and techniques and to feel the infamous adrenaline rush of "The Dinner Service". I was not disappointed. It was stressful and frustrating at times, there was drama and miscommunications, there were more tasks than time, there was never enough space to work, and there was some negative energy lingering in the air at times... But I didn't want any of that to get in my way of enjoying all the new and exciting things I was experiencing. Our Chef created the entire menu, built out of recipes from moments here and there from her career and competitions. Every plate was BEAUTIFUL, and incredibly delicious... I confess that I wasn't expecting to like each and every plate so much, but I did. Usually when I order dessert if I see "chocolate" I look no further. But these plates were so creative and of such high quality that I don't even think the chocolate one (although amazing) was my favourite in the end! (That is saying something). 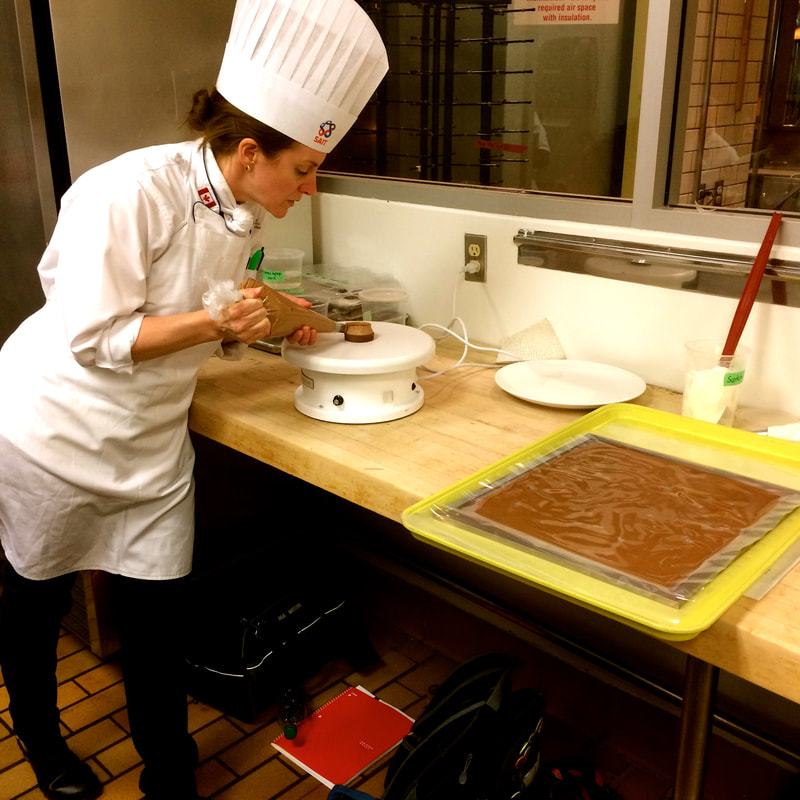 Here is our Chef, showing us how to create the Chocolate dessert. There's a reason they call our program Baking and Pastry Arts I tell you.  Every night, guests at the restaurant chose from this menu:
The Prep People did things like baking bread for the bread baskets, making up pretty little plates of petite fours that each table received with their bill at the end of the meal, and designing and preparing for the specials of the day. The Service Team worked on the restaurant desserts, and were each responsible for plating one dessert and running that station during service time.
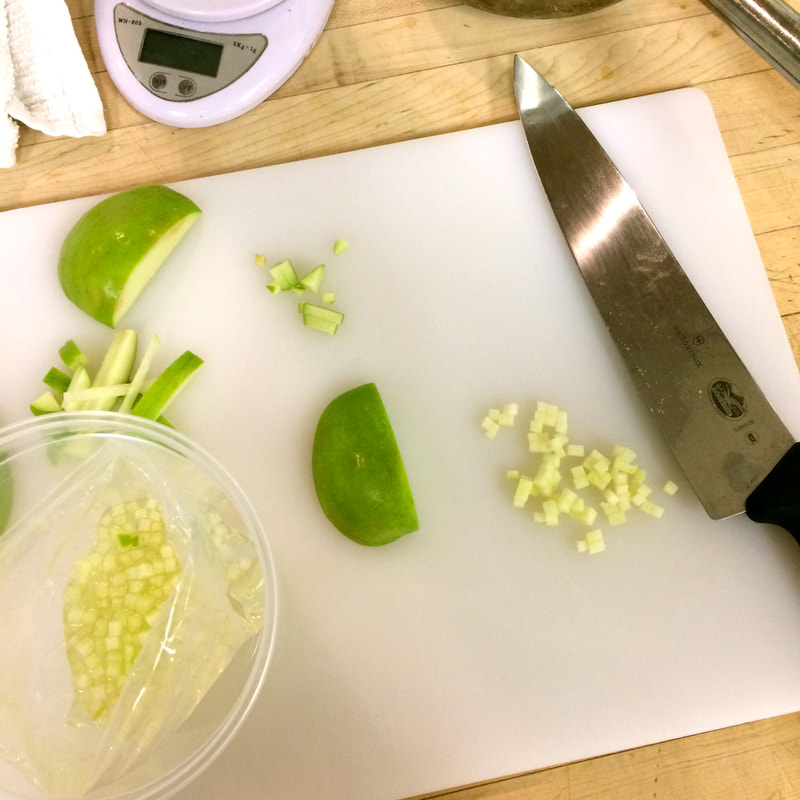
One of the first stations I was in charge of was the Caramel Apple Mille Feuille, which we referred to simply as "Apple". For one reason or another I fell in love with this dish... All the components were simple but soooo tasty and when they all came together on the plate it was just magical! I got lots of knife practice while brunoise-ing apples. Chef told me that she wanted them super tiny, so that they looked like little jewels. I also gained confidence in using the dreaded-potentially-explosive Kryovac Machine... It never exploded on me thank god and it was pretty magical watching all the little bubbles of air being drawn out from the apples, and then a pause, before the big SWOOOOOOOSH when the bag was vacuum sealed shut. All the excess air in the fruit is replaced by the liquid in the bag, making the apples EXTRA FLAVOURFUL. Kitchen magic I tell you! Don't get me started on the apple-caramel sauce, the scotch-spiked-diplomat cream, and the cinnamon ice cream!!! There was also something terribly pleasing about a square dessert on a square plate. 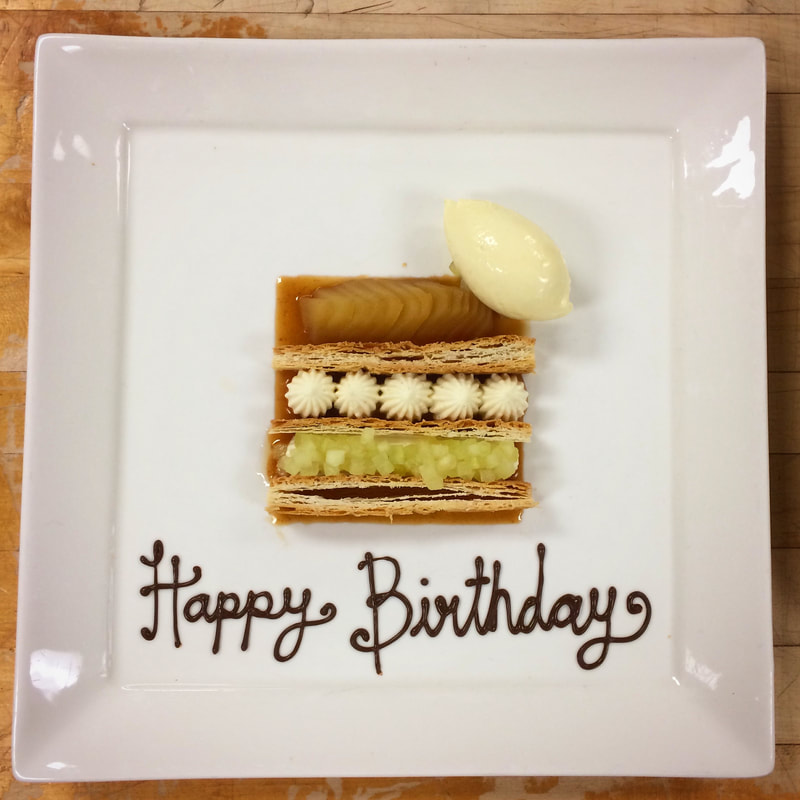 We even got a few chances to practice our piping skills when there were special requests for "Happy Birthday" messages! Next evening, I was in charge of plating the Special, which made me feel indeed special. I did not get to invent the dessert, rather my talented and creative classmate did. I just put the items on the plate the way she had designed... Her creation was AMAZING: chunks of brownie topped with passionfruit ice cream that was covered by a chocolate dome. The servers would then pour a warm raspberry-chocolate sauce over the dome as they presented the dish to the lucky guest. Because the sauce was warm, it would melt away the chocolate dome, revealing the tasty interior! Oh the chocolately drama! I was a fan. 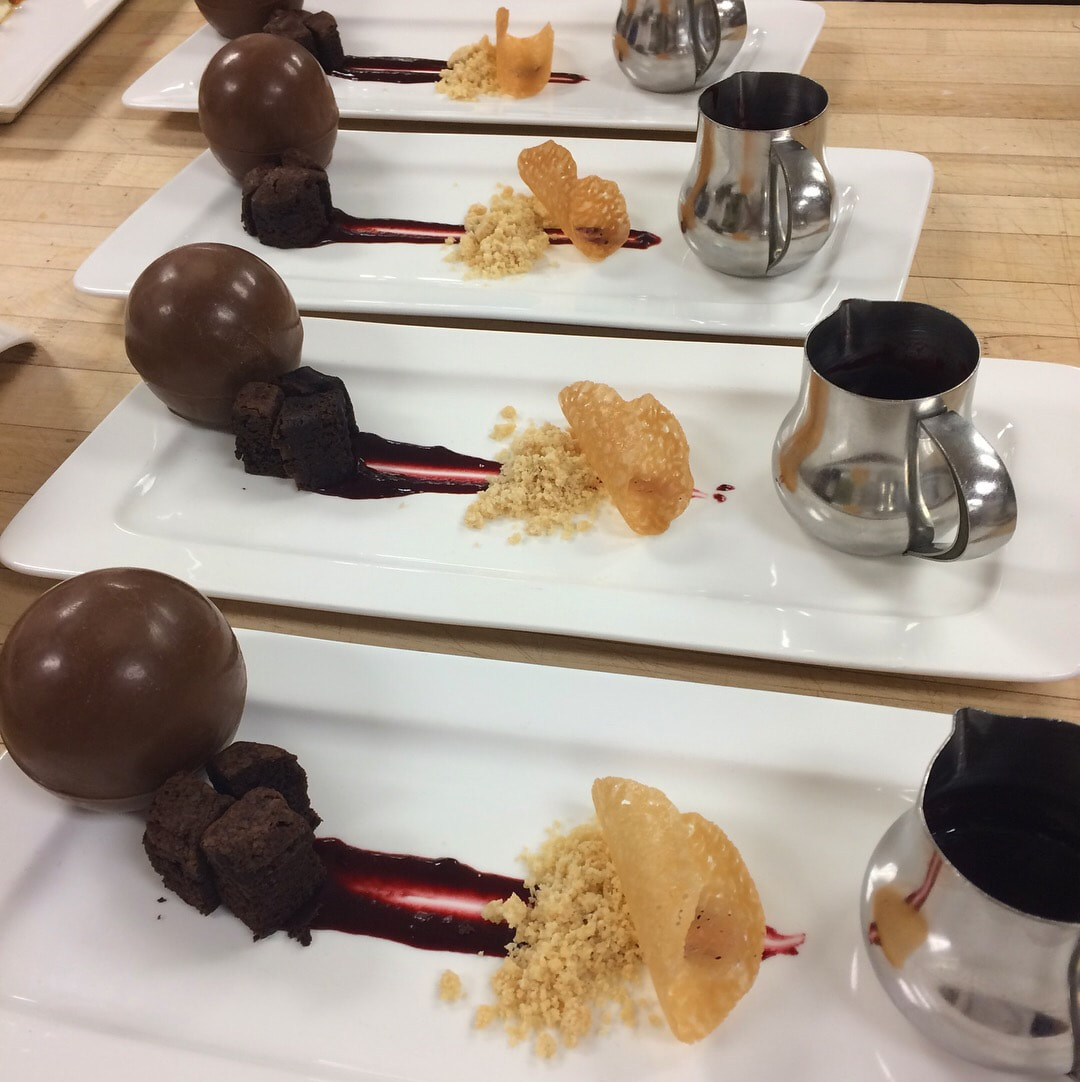 Here you can see the plates before they have the addition of the passionfruit ice cream, which must be scooped at the last minute when all plates for one table are ready to go.
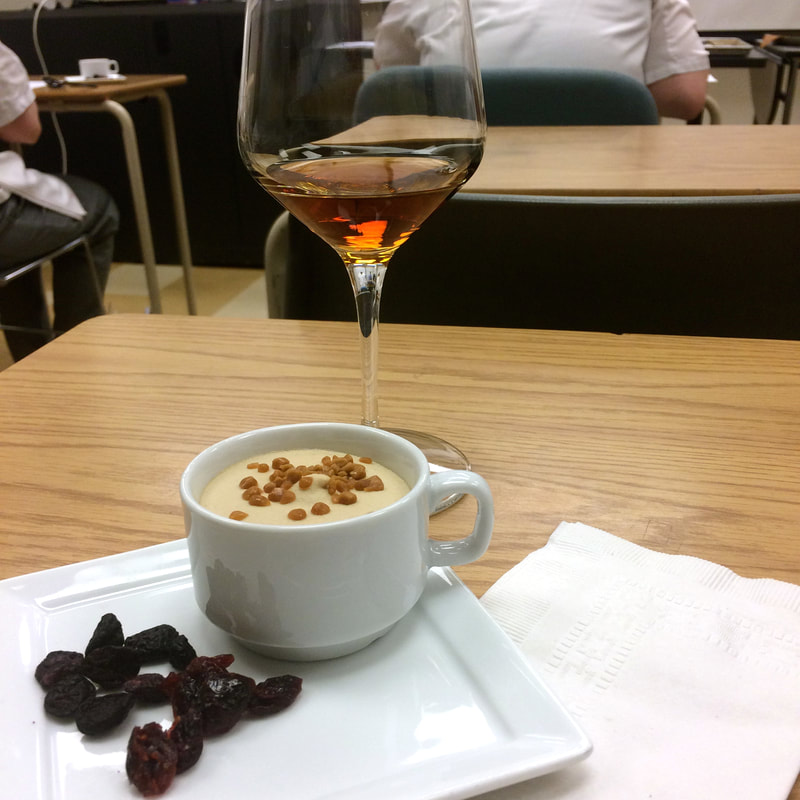
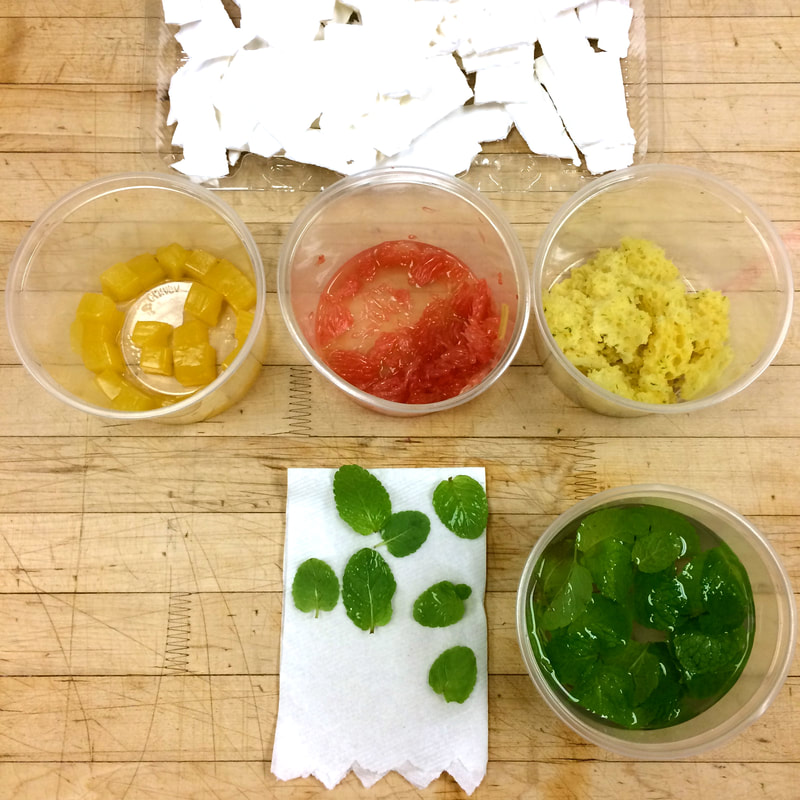
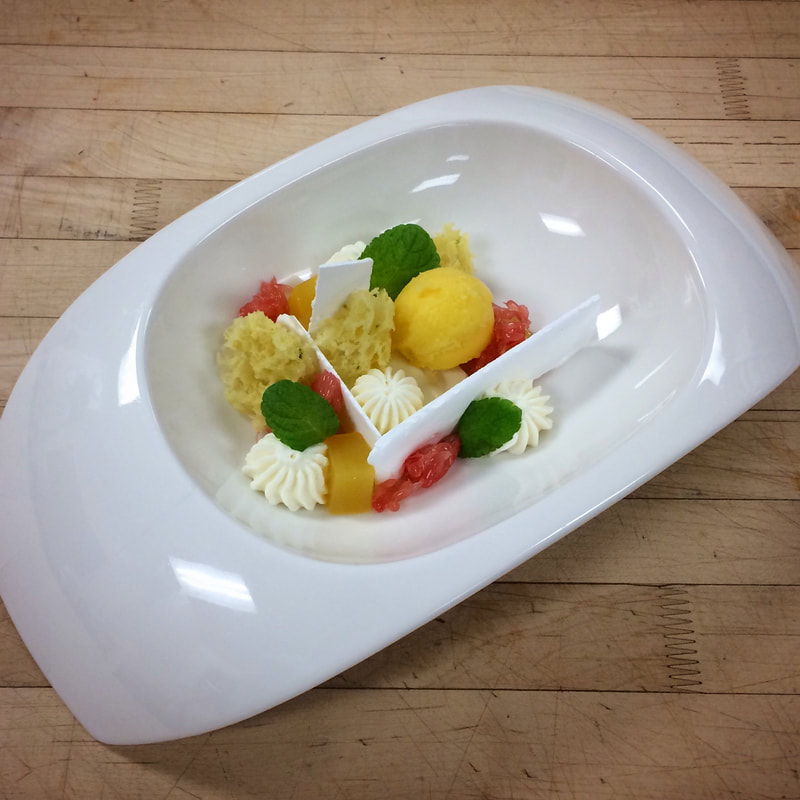
The next evening I got to plate up the modern art spaceship masterpiece known as the Paloma Panna Cotta. A Paloma, if you don't know, is a super delicious cocktail containing tequila and grapefruit juice. YES. A Panna Cotta, if you don't know, is a fun little jiggly Italian dessert that can best be described as milk jell-o. Sounds gross, but truly it is tasty. This dessert features a tequila-white-chocolate-lime panna cotta, grapefruit jelly blocks, lime sponge cake, mandarin sorbet, grapefruit-white-chocolate ganache, fresh grapefruit flesh and fresh mint leaves. It is citrus season after all. (Did you know grapefruit is called grapefruit because, unlike other citrus, it grows in bunches on trees like grapes? fun fact) 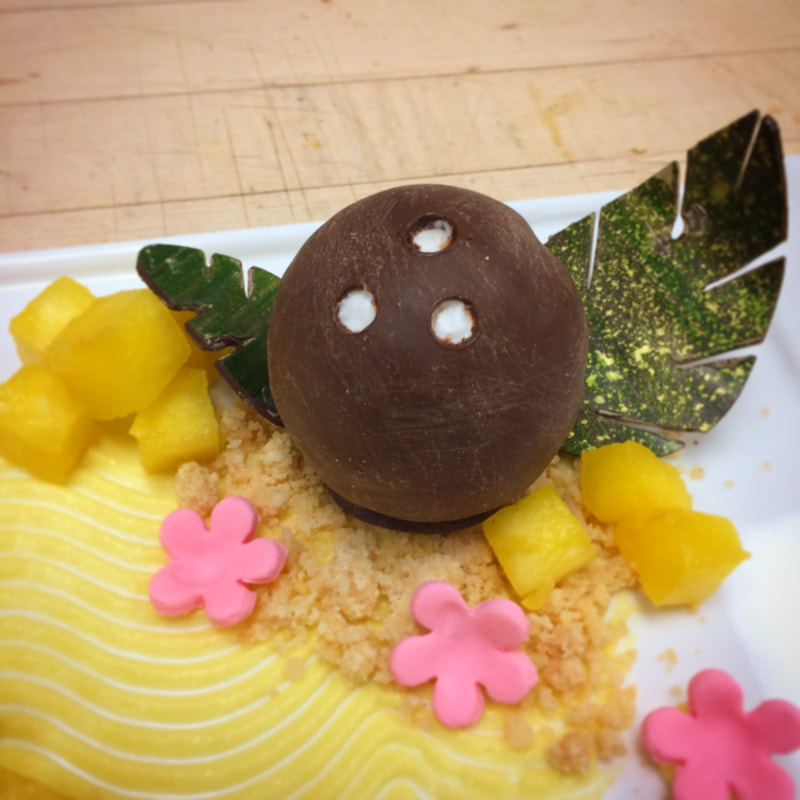 The cutest dessert was the Tropical Coconut Pavé: Chocolate covered coconut mousse "coconuts" filled with passionfruit curd, coconut dacquoise, and chocolate ganache. OMG SO YUMMY. Also chocolate leaf garnish and fondant flowers, shortbread crumble and fresh pineapple. Plating all these was incredibly fun. I would hold my breath when a new ticket came in, hoping they would call out my dessert. I always got stoked when my station got an order.
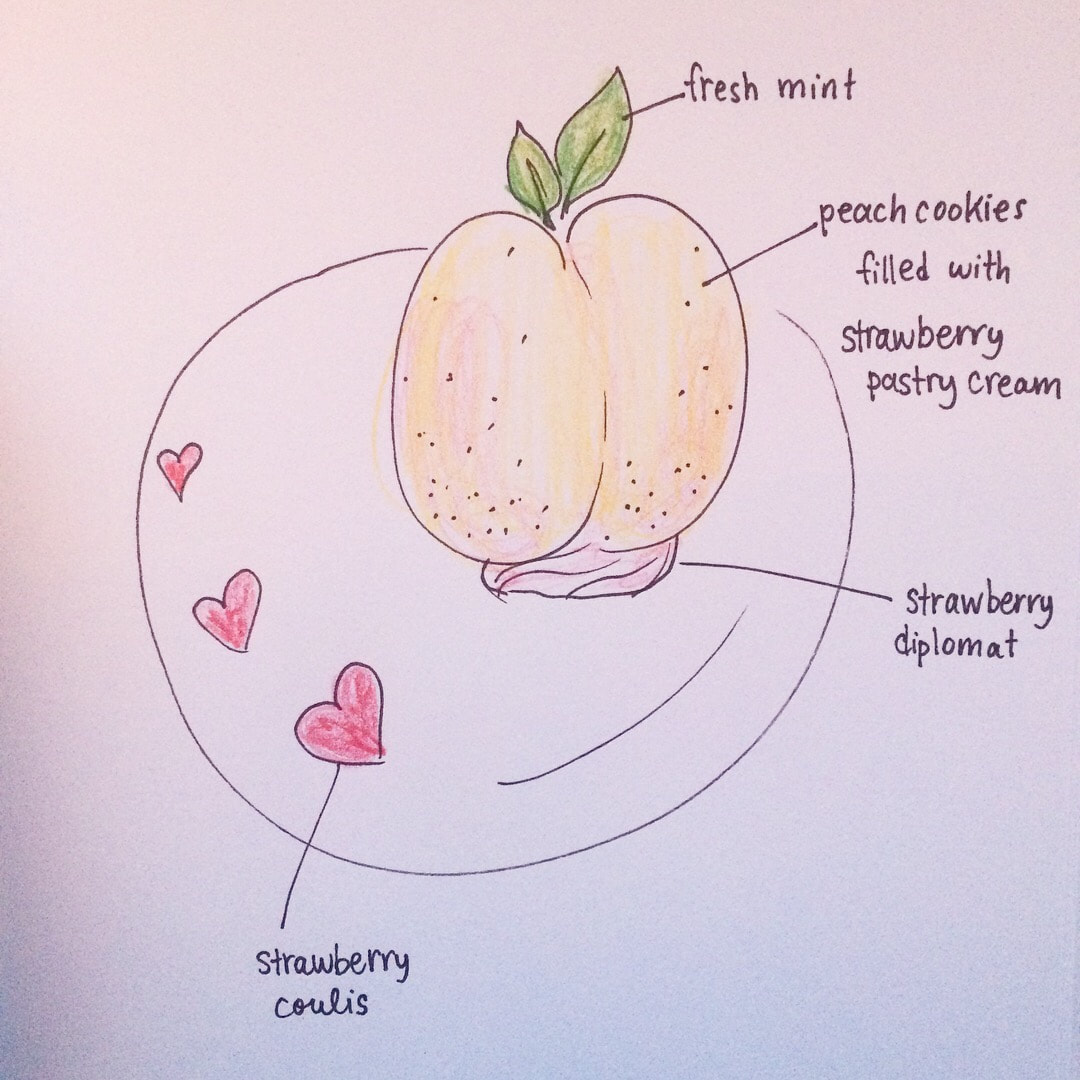
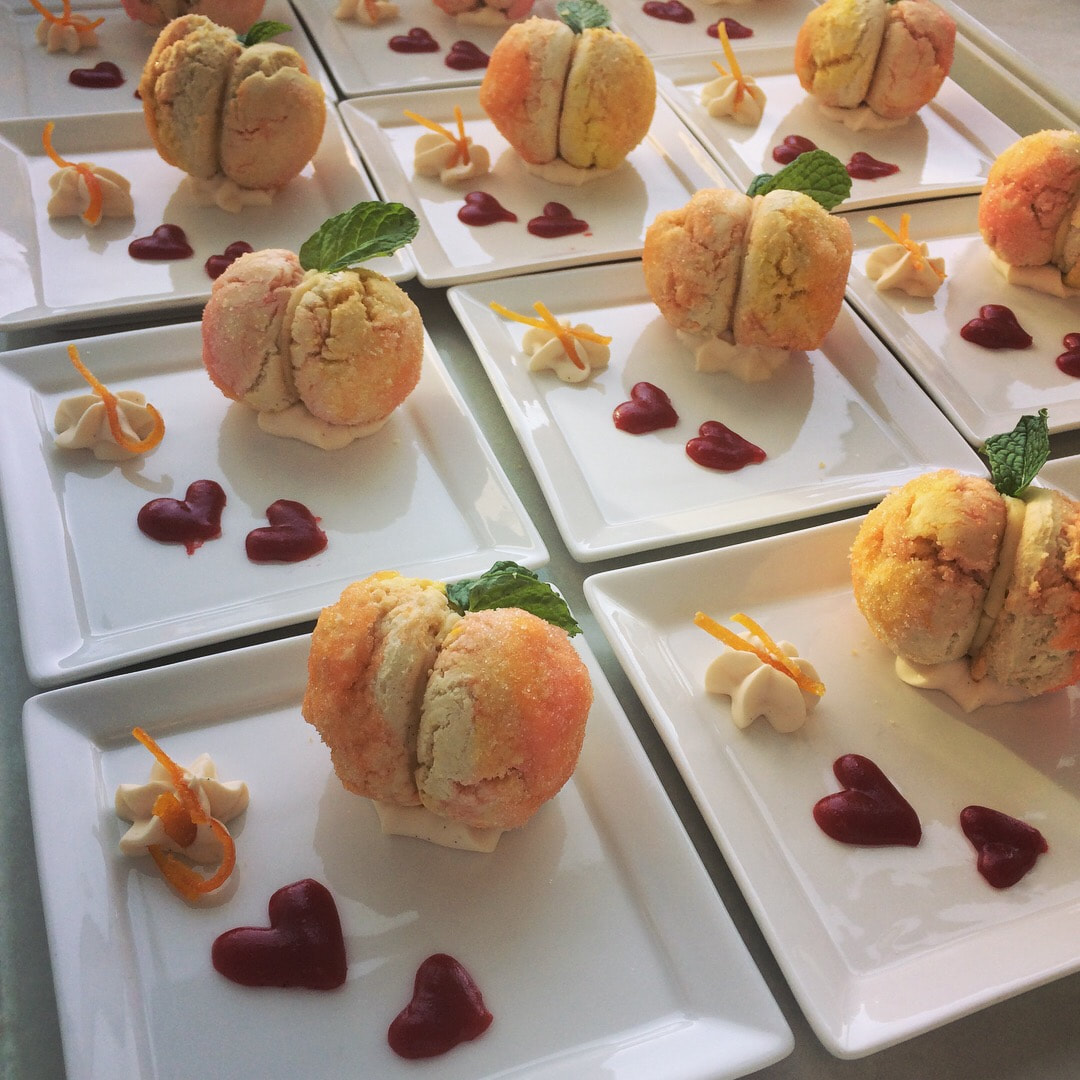
We had a super fun project in which we were to design a dessert menu for a theoretical restaurant of our own invention. I got carried away, and created a fake restaurant that I now really want to be a reality. Long story short, it's a place where the desserts are inspired by local, contemporary, emerging artists. I imagined up six plates inspired by six different artist friends of mine. I couldn't stop thinking about wanting to actually bring these desserts to life. One day in class, I was instructed to make a dessert, without any guidelines, it could be whatever I wanted. I jumped at the opportunity and brought to life one of my drawings: A booze-soaked cookie that looks like a peach, filled with strawberry pastry cream, and garnished with strawberry coulis hearts on the side. Basically something that was unapologetically cutesy, trendy and feminine. In this regard, I succeeded. 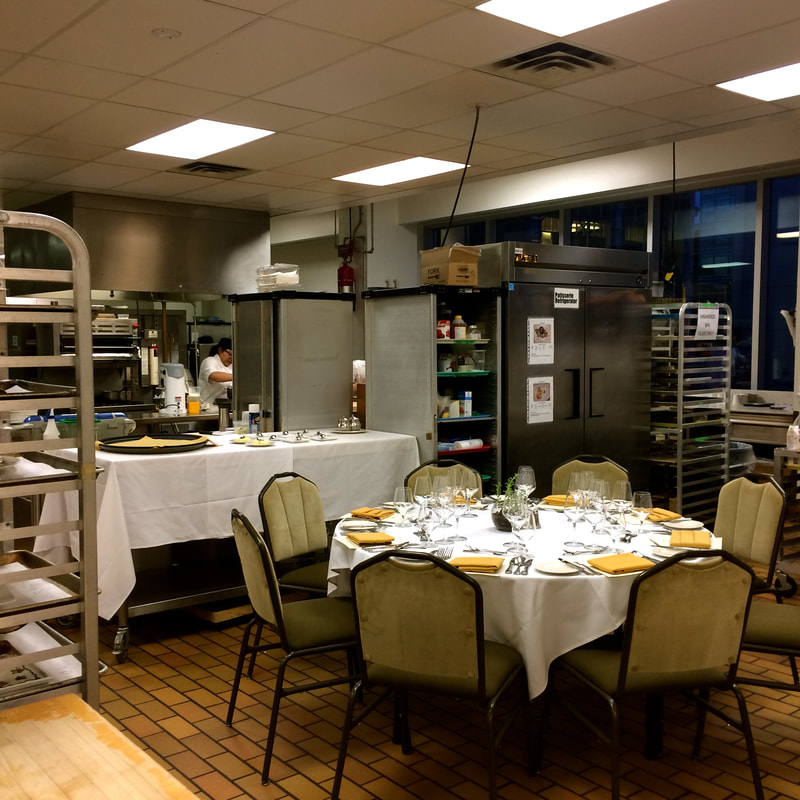 On our final night of service, we had something called "Chef's Table", in which a dining table is literally plunked right in the middle of the kitchen, and a group of certain special-very-importants get to dine in the middle of the action. It also means we have to be extra aware of our cleanliness and professionalism. So obviously I donned my favourite red lipstick and tried to play it cool. The hardest part was when the wine was poured and plates got served and I realized that actually I was STARVING. But my time to eat would be later. A snack at 4 pm and a snack when I got home at 11 pm was my new dining routine. Not my ideal scenario, but such is restaurant life, and it was worth it for the experience. 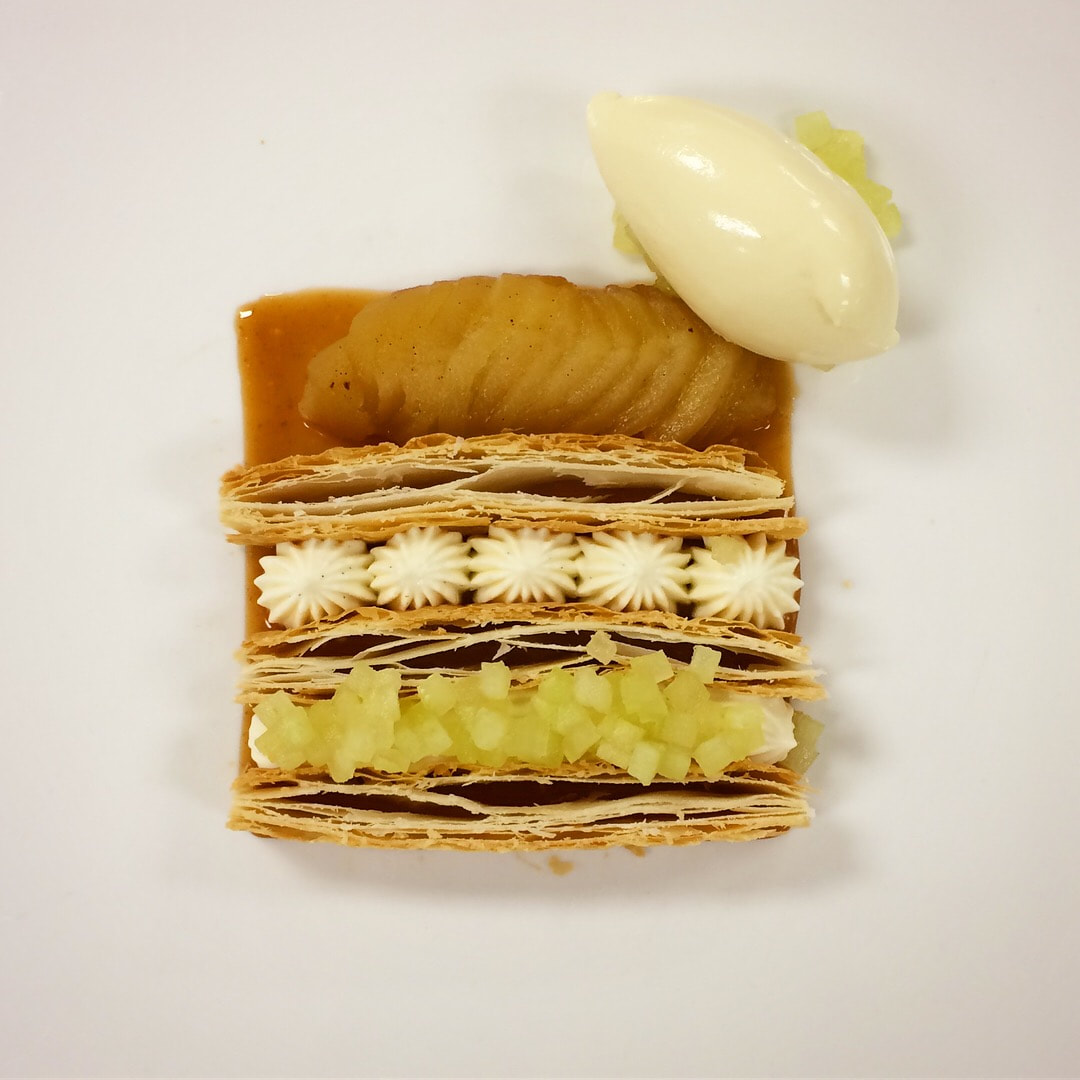
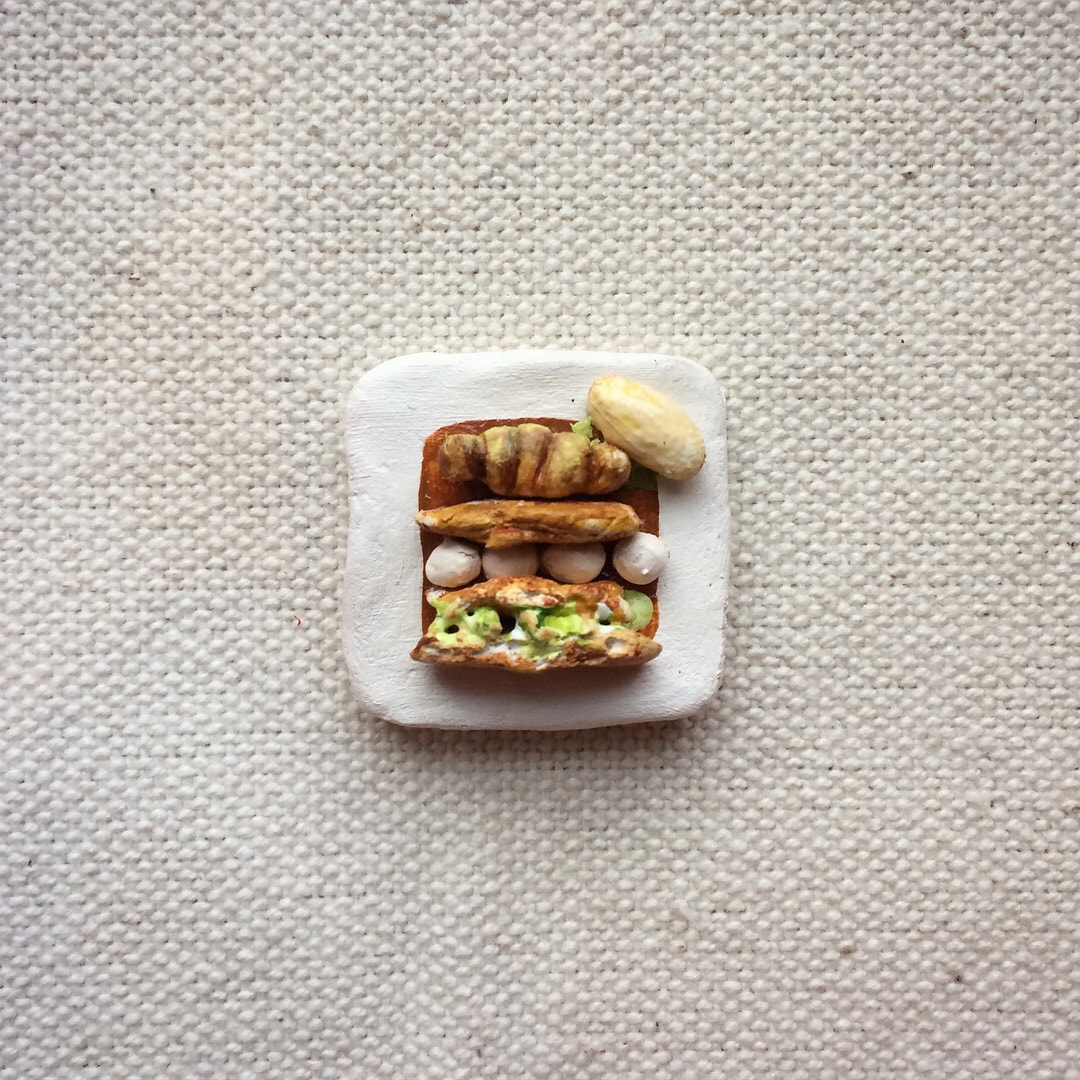
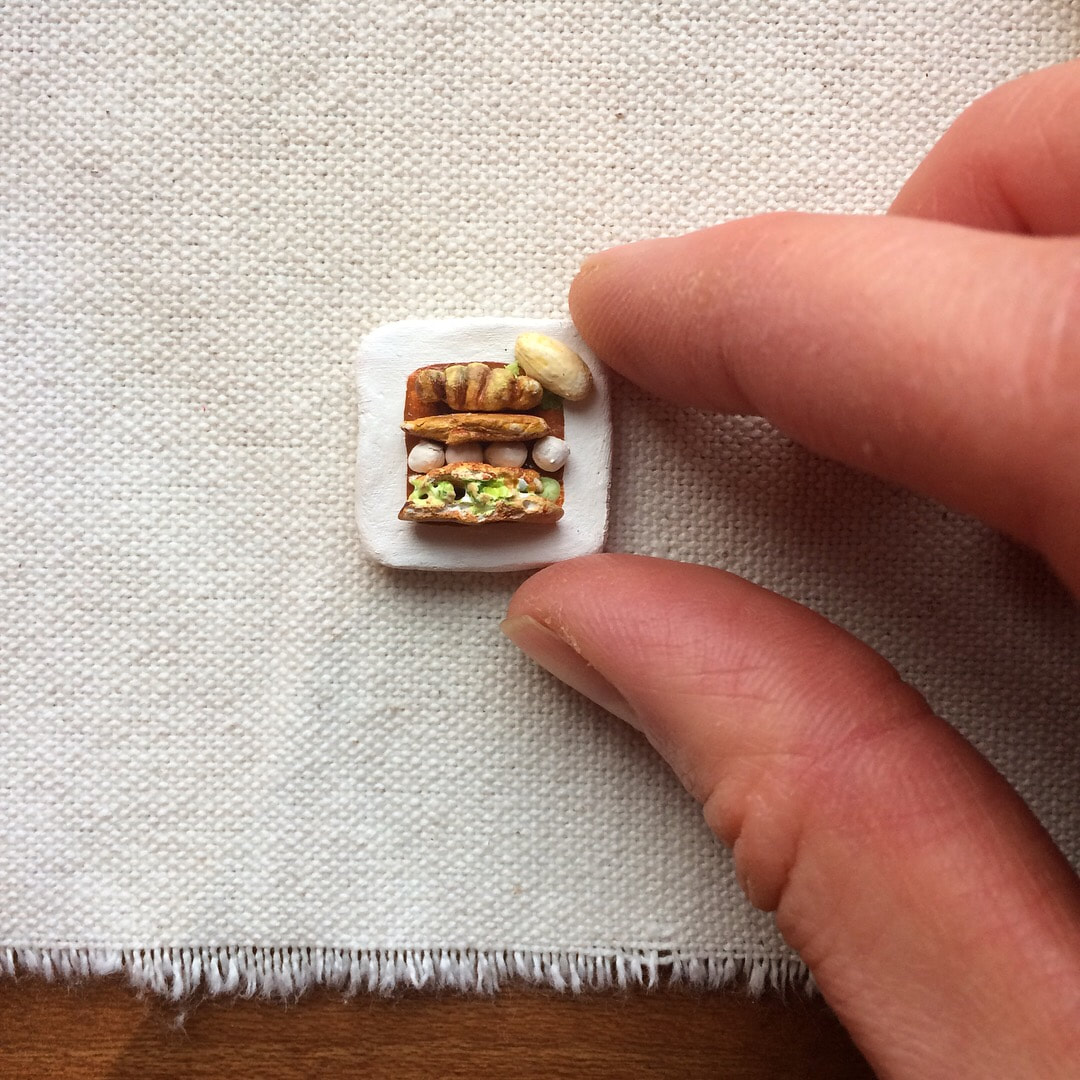
And of course, what would a Tiny Tea Party post be without something tiny? Baking school has inspired me as an artist more than ever, I keep coming up with ideas for paintings, projects, sculptures, all inspired by the stuff I have been learning and making at school. I simply had to turn the work of art that was the Apple dessert into a mini sculpture. I gave it to my Chef on our last day of the class as a small token of my gratitude.
I think my most favourite take-away from this course was learning how to make a sponge cake in the microwave. No jokes. Who would have thought all this time and training would amount to the satisfaction of baking a cake in the microwave. It's my new favourite party trick. I'm not sure if I'll ever get to work in a restaurant plating desserts to order again, so I will look back at the past three weeks with a newfound fondness and respect, and continue dreaming up menus and plates and garnishes and more... just in case. 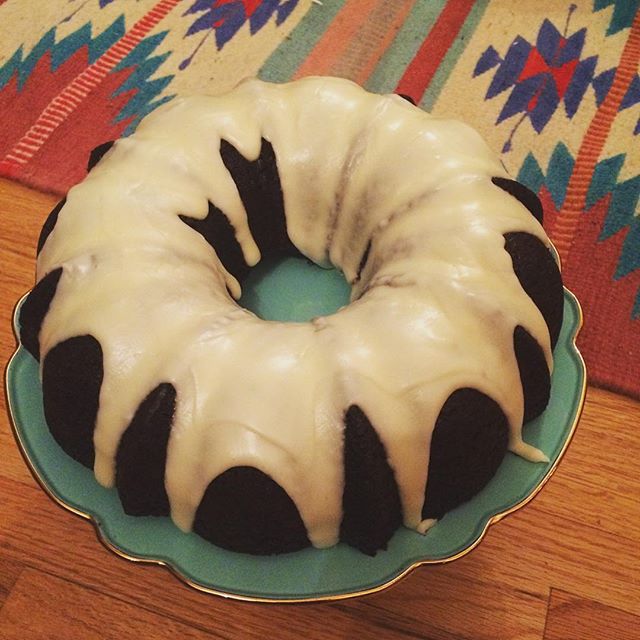 This is my chocolate bundt cake redemption. The last time I made a chocolate bundt cake (my first ever bundt cake), it looked a treat, and tasted okay... but it was very very very dry. Just a big, dense, chunk of cake that was not nearly moist enough to be eaten without lots of frosting or ice cream to hide its serious flaw. I needed to redeem myself, and prove to myself that a moist bundt cake is a thing that exists! Not sure what it is about January and chocolate bundt cakes, but almost exactly one year later I attempted the choco-bundt once again. I succeeded! This cake received rave reviews from everyone I fed it to... the best part is that everyone said, "it's so moist". BAM. Mission accomplished. It doesn't hurt that I brushed it with a rum-favoured simple syrup before I glazed it... an optional step, but like really, why not? The 2nd annual chocolate bundt! Will this become a yearly tradition? I am not sure, but I'm certainly not complaining if it does. Chocolate Bundt cake with Rum GlazeRecipe Adapted from Food & Wine Cake:
Soaking Syrup:
ENJOY! You don't even need ice cream! But I wouldn't turn it away if it were offered... :) |
Tiny Tea PartyIt's about celebrating the tiny things. Categories
All
© 2015 Larissa Costella
All Rights Reserved (All images and content are my own unless otherwise noted) |
 RSS Feed
